There’s something undeniably exciting about getting your hands on a pair of AirPods Pro, even if they aren’t brand new. Apple’s seamless design and groundbreaking noise cancellation features have turned these little wonders into a must-have for tech aficionados. But, as with all tech treasures that have a previous owner, there’s a bit of groundwork to be done before you can dive into your favorite tracks or podcasts.
Buying pre-owned tech is not just a great way to save some bucks, but it’s also an eco-friendly choice in today’s throwaway culture. However, when it comes to devices like the AirPods Pro, starting with a clean slate is paramount. Not only does it ensure that they’re disconnected from any remnants of the previous owner’s devices, but it also guarantees that your new-to-you AirPods Pro pair seamlessly with your device. Let’s deep dive into the steps to make sure you kick things off without a hitch.
Introduction
AirPods Pro offer numerous features including noise cancellation and a customizable fit, making them a sought-after accessory for Apple enthusiasts. If you’ve bought a used pair, it’s essential to start with a clean slate. Resetting them ensures that any connection or pairing issues due to previous ownership are resolved.
What You Will Need on How to Reset AirPods
- AirPods Pro and their charging case
- A Lightning cable and charging source
- A device to pair with (such as an iPhone or iPad)

Steps to Reset AirPods Pro
1. Ensure the AirPods Pro are Charged
- Before starting the reset process, make sure your AirPods Pro and their charging case have enough battery. If not, use the Lightning cable to charge them.
2. Place the AirPods in the Charging Case
- Open the lid of the charging case.
- Insert both AirPods Pro into their respective slots in the case.
3. Locate the Setup Button
- You’ll find a small, round button on the back of the charging case, known as the setup button. This is the key to resetting your AirPods Pro.
4. Press and Hold the Setup Button
- Close the lid of the charging case.
- Press and hold the setup button on the back of the case for about 15 seconds.
- Keep holding until the status light in the front starts flashing amber several times and then eventually flashes white.
5. Reconnect the AirPods to Your Device
- After the reset process is complete, the AirPods Pro are ready to be paired with a new device.
- On your iPhone or iPad, go to Settings > Bluetooth.
- Open the lid of the AirPods Pro charging case and press the setup button on the back of the case until the status light flashes white.
- “AirPods Pro” should appear under the list of available devices on your iPhone or iPad.
- Tap on “AirPods Pro” to connect them.
Frequently Asked Questions About How to Reset AirPods
1. Can I remove Apple ID from AirPods without the previous owner?
Unfortunately, no. Apple places a high priority on user privacy and security. To remove an Apple ID from AirPods, you require the previous owner’s cooperation. They need to manually remove their Apple ID for you to then be able to add your own. This remains true even if you’ve reset the AirPods and removed the previous owner’s data from them. Until the previous owner’s ID is removed, you won’t be able to link the AirPods to your iCloud ID.
2. How can I reset AirPods Pro without a phone?
Good news here! Resetting your AirPods doesn’t require a phone. The AirPods, and especially the AirPods Pro, have a button on the charging case that’s dedicated for this purpose. To reset, press and hold this setup button for a few seconds, and your AirPods will be good as new.
3. Can the previous owner track my AirPods?
If the previous owner enabled the “Find My AirPods” feature via their iPhone, they would be able to track the location of the AirPods. However, this tracking capability becomes void once the AirPods are reset by a new owner. It’s important to note, though, that some features might be inaccessible without the associated Apple ID.
4. Can AirPods save what I listen to?
This is a myth. AirPods don’t possess the internal storage necessary to keep a record of what you’ve listened to. They act as a medium for sound, transmitting the audio from the connected device, without keeping any information themselves.
5. Can AirPods store call and audio history?
Absolutely not. The AirPods do not have the capability to store any form of history, be it call or audio playback. For playback history or call logs, you’d need to check the device that the AirPods were connected to, such as an iPhone or iPad.
In a world that’s becoming increasingly concerned with privacy and security, it’s reassuring to know that tools like AirPods are designed with these principles in mind.
If you’re an iPhone enthusiast, you might think you know all there is to know about your device. However, there are always hidden gems waiting to be discovered. Dive into our article on “10 Awesome Less Known iPhone Features” to uncover functionalities you might’ve missed. Whether you’re a tech aficionado or just love discovering new tricks, this article is a treasure trove of iPhone secrets.
Conclusion
Resetting AirPods Pro from a previous owner ensures that you can enjoy all the features they offer without any hitches. By following the steps above, you can easily prepare your pre-owned AirPods Pro for fresh and personalized use. Happy listening!
For those new to Apple’s AirPods or even seasoned users looking for a deeper understanding, Apple provides a comprehensive AirPods User Guide on their official website. This guide covers everything from basic setup procedures to advanced features, ensuring you get the most out of your listening experience. Whether you’re troubleshooting an issue, trying to understand gesture controls, or exploring new updates, the guide is a valuable resource. Dive in to uncover all the nuances and capabilities of your AirPods. For the complete details, visit Apple’s official website.
]]>If you receive Snaps from your friends, Snapchat will show an icon of a different color, depending on the type of Snaps available:
- Blue: A message from Chats
- Red: One or more Snaps without audio
- Purple: One or more Snaps with audio (this is a great tip that warns you to lower your device volume if you are opening the Snap in public).
In addition to these neat features, Snapchat also makes sure to let you know if someone takes a screenshot of your Snap, which is a pretty useful feature concerning data privacy.
In addition to Snaps, Snapchat was the first app to come up with the Story feature. A Snapchat Story consists of Snaps that are gone within 24 hours. Once 24 hours are up Snapchat deletes the Story automatically. If you want a Story to stick longer, you have the option to save the Story to Memories.
However, there is another tempting feature which has driven everyone to use Snapchat everyday: Snapchat Streak. Or in short, Snapstreaks.
If you’re new to Snapchat or have no idea what a Streak is even though you’ve been using Snapchat for a while, fear not. After reading this article, you will know all there is about Snapstreaks and its magic that has taken over the world.

What is a Snapstreak?
Even if you have no idea what a snapstreak is, we guarantee that you have used this feature at least once if you are a Snapchat user. A Snapstreak is all about sending snaps to your friends, but everyday. You need to pick one person in your friend list and share snaps with them daily, be it a friend, a sibling, or anyone you like to share a piece of your life everyday for as long as you are planning to maintain the streak.
In a way, Snapchat is helping you to keep up with your loved ones on what’s going on in each others’ lives, which helps you to cherish the bond between each other, especially in the time of a pandemic like now where most of the world is confined to their homes.
Snapstreak Rules
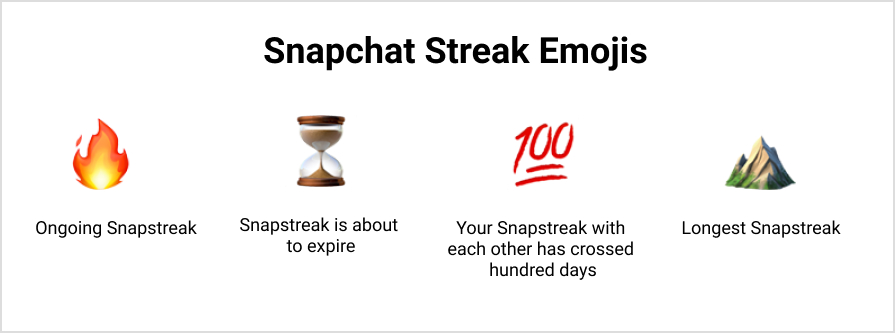
There is only one rule in Snapstreak: be consistent in sharing daily snaps with your friends to maintain the streak for as long as you can. Snapchat will indicate what stage you are in your streak with an emoji, depending on the period you have been maintaining your streak.
What Does Each Snapchat Emoji Mean?
- Fire Emoji – Ongoing Snapstreak
- Hourglass Emoji – Snapstreak is about to expire
- 100 Emoji – Your Snapstreak with each other has crossed hundred days
- Mountain Emoji – Longest Snapstreak (World Record)
What is the longest snap streak?
As of July 26, 2021, the world record for the longest Snapchat streak belongs to Carly Buffa and Maddie. They have maintained their streak ever since the feature was first introduced!
The second highest one listed as of May 11, 2021, were Alyssa Collins and Caitie McArthur, who have maintained a streak for 2254 days.
How to maintain a snap streak
Keeping up a streak could be tougher than you think. Even though it seems easy to start a streak by sharing photos, selfies, or videos daily with a friend or a sibling, people often begin to forget that it’s something that should be done by both parties every day in order to keep a streak going. Once one of you stops sharing snaps in a streak, the streak “dies” and you have to start all over again. If you are determined to keep a Snapstreak going, here are some tips to maintain a streak:
- Make sharing a snap a part of your everyday routine: Maybe start your day by sending a snap to whoever you are maintaining your streak with.
- Remember, all people involved in a streak must share a snap everyday with the others. Only one person sharing snaps to keep up a streak doesn’t count.
- Keep tabs on the person you’re sharing the streak with: If you don’t receive a reply at the usual time, remind them with a message that you’re waiting for their reply.
- Keep an eye on Snapchat’s indications on your streak. If both parties of a Snapstreak are running out of time to save the streak, an hourglass emoji appears. Snapchat doesn’t specify exactly when the hourglass appears, but according to longtime users of the app, the hourglass appears at least 20 hours after a snap is shared if the other person has not replied.
- You must share a picture or a video in order to maintain the streak. Chat messages without any photos or videos don’t count.
Why maintain a Snapstreak?
Maintaining a snapstreak makes the experience of using Snapchat a whole lot fun, in addition to all the cool and creative filters the app provides.
You can also get streak rewards! While Snapchat doesn’t offer any real prizes, you can unlock cool features such as trophies and badges.
Also, some people might say it provides some sort of a spiritual gain to see a snapstreak being kept up with the sense of a competition, so go figure.
Conclusion
If you are determined to break the record for the longest snapstreak and you are only starting now, you obviously cannot reach the numbers recorded at the moment, but it never hurts to try! What you will have to do other than keeping up your streak, is to pray that the longest streak holders will eventually forget to streak and their streak will expire.
Something that you need to keep in mind about the journey to the longest snapstreak: The key is consistency, and consistency will benefit you in the long run. This also applies to everything else in life, not just your Snapchat score.
People also read about 5 IoT Predictions that will Change the World and 6 Predictions about the future of Cryptocurrency
]]>is the single most important selling point of laptops such as MacBook Air and the key to its portability is the battery and battery life. There can be many reasons which can affect the draining of your MacBook’s battery all the way from product errors to the way you use the MacBook. If your Macbook air battery draining fast, below are some of the possible answers and It will be helpful in ways so you can save the battery life of your device for more convenient use. Read our article How to Check Battery Health on MacBook from here.
Before jumping into any conclusion about your device follow these steps to check for the condition of the battery of the device. Hold the Option key on the keyboard and click on the Battery Icon at the top of the menu bar.
You’ll see one of four conditions:
- Normal: The battery is functioning normally.
- Replace Soon: The battery is functioning normally but holds less charge than it did when it was new.
- Replace Now: The battery is functioning normally but holds significantly less charge than it did when it was new. You can continue to use the battery until you replace it without harming your computer.
- Service Battery: The battery isn’t functioning normally, and you may or may not notice a change in its behavior or the amount of charge it holds. Take your computer in for service.
Now that you have an idea about the condition of the battery it’s better to move on to the UI and the features aspect of drainage of the battery life.
Check Display Settings
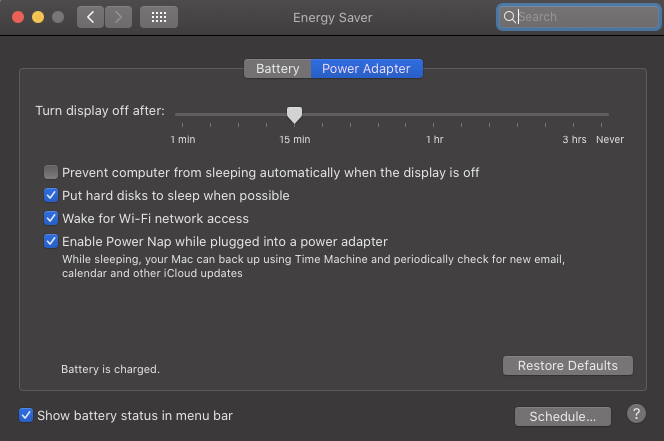
Powering the display is the biggest drain on battery resources. So, first things first: Lower the brightness of your display to a level that’s comfortable for your eyes. The brighter your display, the shorter your battery life. You can also set the display to dim slightly on battery power and to shut off after a period of inactivity by going to System Preferences > Energy Saver.
Make Sure Your System is up to Date
Staying current with macOS updates will help you get the best possible battery life. To check to see if an update is available for your MacBook, go to System Preferences > Software Update.

Quit Applications Which are Not in Use
Close programs that you are no longer using to help save the battery. This can be done by clicking the Command and Q keys at the same time or clicking on the program in the top menu bar and selecting the Quit option.
Resetting the System Management Controller (SMC)
Resetting the system management controller (SMC) can resolve certain issues related to power and battery. To reset the SMC follow these steps,
Shut down your Mac.
- On your built-in keyboard, press and hold all of the following keys. Your Mac might turn on.
Control on the left side of your keyboard
Option (Alt) on the left side of your keyboard
Shift on the right side of your keyboard - Keep holding all three keys for 7 seconds, then press and hold the power button as well. If your Mac is on, it will turn off as you hold the keys.
- Keep holding all four keys for another 7 seconds, then release them.
- Wait a few seconds, then press the power button to turn on your Mac.
Helpful Articles:
Leave a comment if this article is helpful and If you found a solution to Macbook air battery draining fast.
]]>Why Your iPhone Contacts Disappeared?
There are few reasons you may meet that can cause iPhone contacts missing or disappeared:
- Jailbreaking your iPhone
- New iOS software update or iOS downgrade
- Mistakenly delete your contacts
- iOS system issues or iTunes restore/sync issues
Many iPhone users have reported and informed about this issue and I’ve personally had this issue previously. Fortunately, it is easy to bring back the iPhone missing contacts right now, and here is how you should do it
How to Bring Back the Missing Contacts on an iPhone.
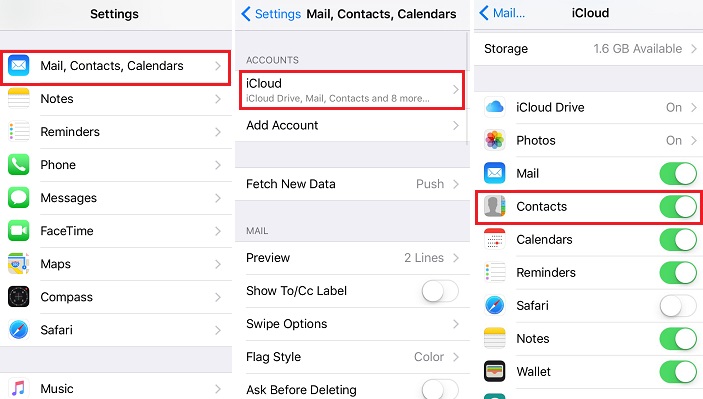
Method 01: Disable Contacts in iCloud and Turn on again
Step 1: Go to Settings > iCloud.
Step 2: Turn off the toggle for Contacts. If you get a prompt for removing the previously synced contacts, choose Delete from My iPhone (this will remove the contacts just from your iPhone and not from iCloud).
Step 3: Now force reboot your iPhone:
- Press the Sleep/Wake and Home buttons together until your device restarts and you see the Apple logo. On iPhone 7 and iPhone 7 Plus, you have to press the Volume Down and Home button.
Step 4: Go back to Settings > iCloud and toggle on Contacts.
Method 02: Sign out of iCloud and Sign-in again
Step 1: Go to Settings > iCloud.
Step 2: Scroll to the bottom and click on Sign Out.
Step 3: Now Sign-in to your iCloud account.
Step 4: Make sure that the toggle for Contacts is turned on.
Method 03: Restore your iPhone from iTunes Backup
If you took a backup of your iPhone recently in iTunes before this problem appeared, then you can restore from that backup to get back the missing contacts from iPhone.
Step 1: Connect your iPhone to your computer and open iTunes.
Step 2: Click on the device icon to open the Summary page.
Step 3: Tap on Restore Backup.
Step 4: Choose the most recent backup of your iPhone and then tap on Restore.
Method 04: Change Groups Settings
Step 1: Open the Phone app.
Step 2: Go to the Contacts tab.
Step 3: Tap on Groups in the top left corner.
Step 4: Deselect the All iCloud option.
Step 5: Now click on All [iPhone Name] to select it.
Step 6: Click on Done in the Top Right Corner to save the settings.
In the contacts list, you will now see a list of all the contacts saved on your iPhone. Find the ones that are missing and add them to your contacts. This will sync it with iCloud.
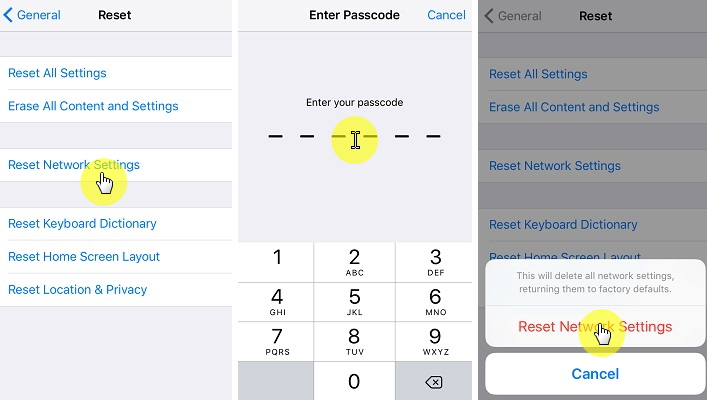
Method 05: Reset the Network Connections
Step 1: Go to Settings > General > Reset > Reset Network Settings.
Step 2: Enter your passcode when requested.
Step 3: You should see a warning message that this action will delete all your network settings. Choose “Reset Network Settings” to continue.
Step 4: Check to see if your contacts disappeared from iPhone are back
These are the 05 methods for getting back the contacts that are absent on your iPhone. It can be frustrating when your important contacts disappear all of a sudden out of nowhere, so we suggest that you regularly take backups of your iPhone in iTunes to prevent losing your important data.
Ever used another method of restoring your missing contacts? Let us know in the comments below.
iPhone Contacts Disappeared After iOS 14 Update? How to Fix
Read more tricks about iPhones here
1. Flash Light Alerts
There are notification lights in Android and Blackberry, but some users were disappointed by their absence in iOS. Do not worry. They are not absent. You can make your phone send notification alerts using the flashlight.
Simply follow the below steps to activate this feature.
Settings > General > Accessibility > LED Flash for Alerts and press the toggle button. If you enable Flash on Silent mode, you will receive a flash notification even when your phone is on silent mode.
2. How to access built-in emojis
You obviously know what emojis are. There are several apps available on the App Store to make your phone have emojis. But did you know that you don’t have to download them? Because you can access the built-in emojis on your phone.
Open Settings > General > Keyboard > Add New Keyboard. Then swipe through the list until you find Emoji.
You’ll now see the language keyboard you chose at the initial setup of your iPhone, as well as the emoji keyboard. Which means you’ve enabled emoji keyboard and are ready to use.
3. Hidden Accents on your iPhone
People don’t only type on their iPhones purely in English. There are several other languages which they use including ones which require accents, such as French and Spanish.
There is a hidden feature on iOS to allow you type in words with accents so easily. Normally you can’t see them on your onscreen keyboard but it does not mean that they are not there. You have to enable the option and press and hold special keys to add the accents. To know which keys to press, follow the link below.
4. Call Blocking and Text Blocking
You might have a couple of people in your life whose voice you don’t want to hear again and whose words you don’t want to see again. You might want to keep them out of your life for good. May it be a personal affairs problem or a spamming businessman, you can block them from phone, messages and even FaceTime now.
You can block them from the contacts app if you have saved the number. If not, just block them from the app which they contacted you. Simple as that.
- Open the Phone app and tap Recent
- Tap the I icon next to the number you wish to block to open its detailed information screen.
- Scroll to the bottom of the screen and tap Block This Caller.
- In the confirmation screen, either tap Block Contact to block the number or tap Cancel if you change your mind.
5. How to Change Siri’s Voice
Apple has its own digital personal assistant. It has a nice female voice with the ability to showcase certain emotions with her voice. There is a trick where you can make Siri a man. This works if you are using iOS 7 upwards.
Follow the steps given below to make Siri a man!
Settings > Siri > Search Siri Voice > Male
Just after these few steps, Siri’s manly voice will start to download and then be ready to use.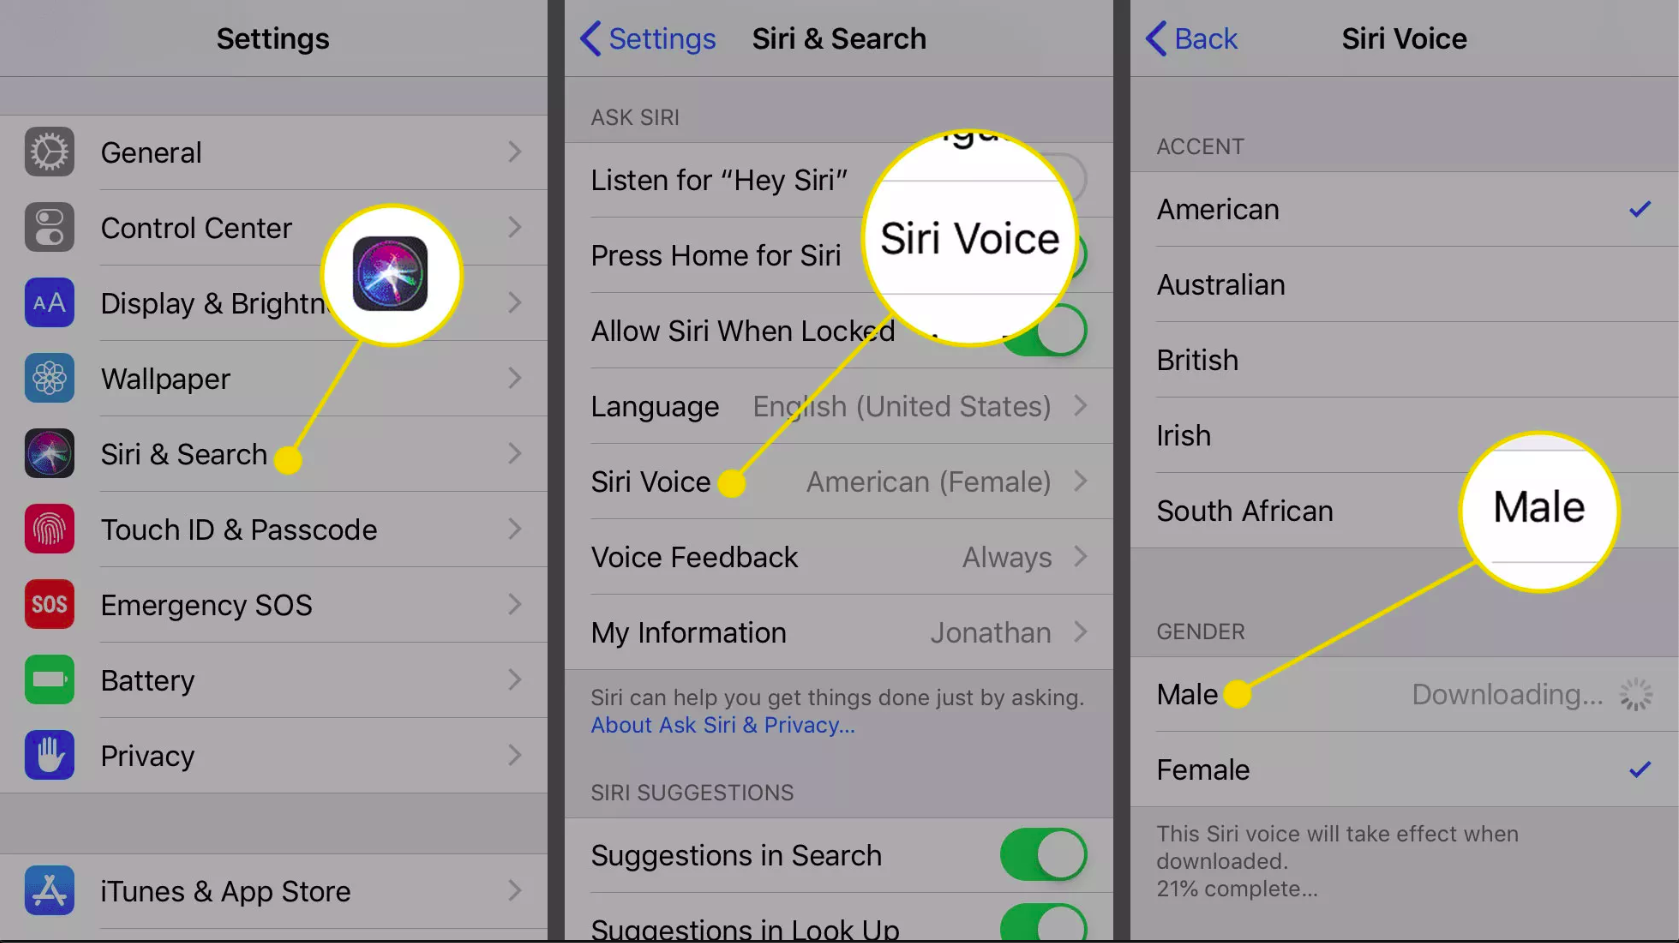
6. Forward texts to share
You don’t have to copy and paste the message every time you want to share a message with a person or a group of people. Just press and hold the message you want to share and a pop-up will appear with the feature to forward. From there, you can choose whom you want to share the message with.
- Tap Messages.
- Select the conversation that includes the message you want to forward.
- Tap and hold the message you want to forward. A menu appears at the bottom of the screen that offers several choices including Copy, Save, and More (in iOS 10, reaction options appear above the text message).
- Tap More.
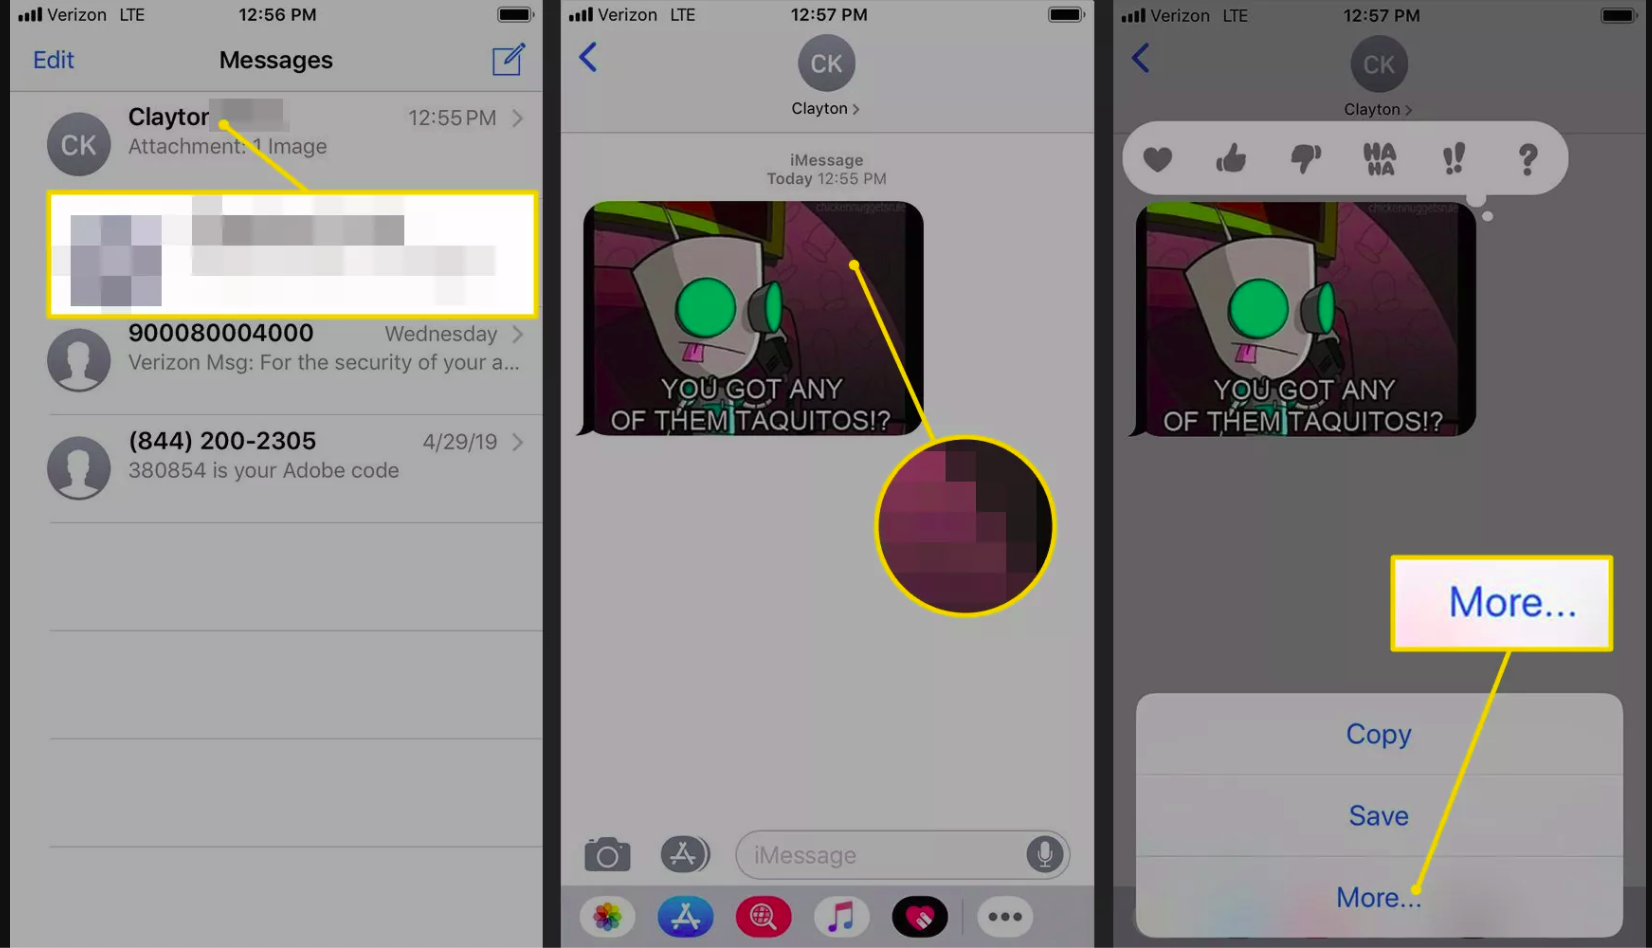
- The message you selected has a blue checkmark next to it, indicating that it’s ready to be forwarded. Tap other empty circles to forward those messages at the same time.
- Tap Share (the curved arrow). A new text message screen appears with the message or messages you’re forwarding copied in the text area.
- In the To field, type the name or phone number of the person you want to forward the message to. Include more than one person to send a group message.
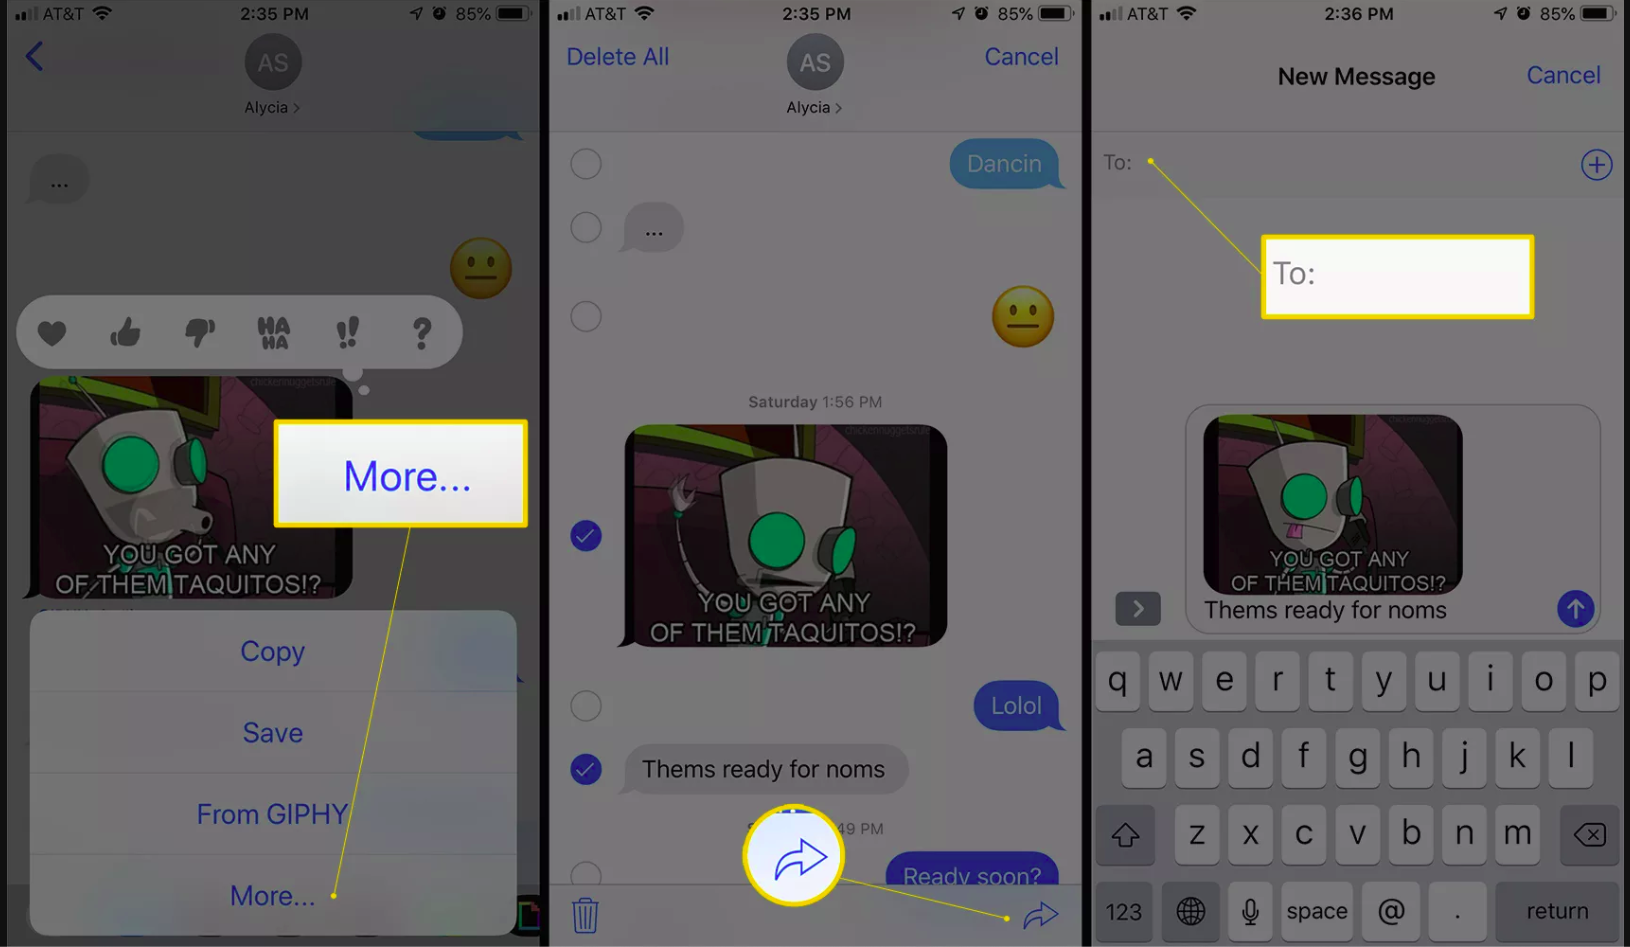
- Tap Send
7. Max the number of photos you take with a single shot
iPhones are famous for their amazing camera quality. You can capture stunning portraits, food photos and many more with this superior quality camera and unique effects. But there have been several complaints about the quality of action photos taken with iPhone cameras. But now, from iPhone 5s upwards, there is a feature called Burst Shot which allows you to take a number of photos with a single tap. 10 photos per second, to be exact. Now you can be assured that in a couple of those many photos, there is the perfect moment captured.
8. Disabling AMBER Alerts
With iOS 6, Apple introduced an AMBER alert system, which notifies you with emergency alerts issued in your area. If you find these notifications disturbing and unwanted, you can always disable them. But it is highly recommended that you keep them enabled.
However, here are the steps to disable them.
Settings > Notifications > AMBER alerts and toggle the button off.
9. Prevent advertisers from tracking you
Advertisers who use ad networks to track your website visits, make you see the same advertisement banner everywhere. This is disturbing much. So, you can block them from tracking you. It will not stop, but it will effectively reduce. If you are using iOS 6 upwards go to Settings > Privacy > Advertising > Limit Ad Tracking.
10. Frequent Locations
iOS can track your frequent locations and build patterns of your daily routes. And they will start providing you with the weather condition, traffic alerts and other information on your route. This is called Significant Locations. It is turned on by default. You can turn this off or change data by going to Settings > Privacy > Location Services > System Services > Significant/Frequent Locations.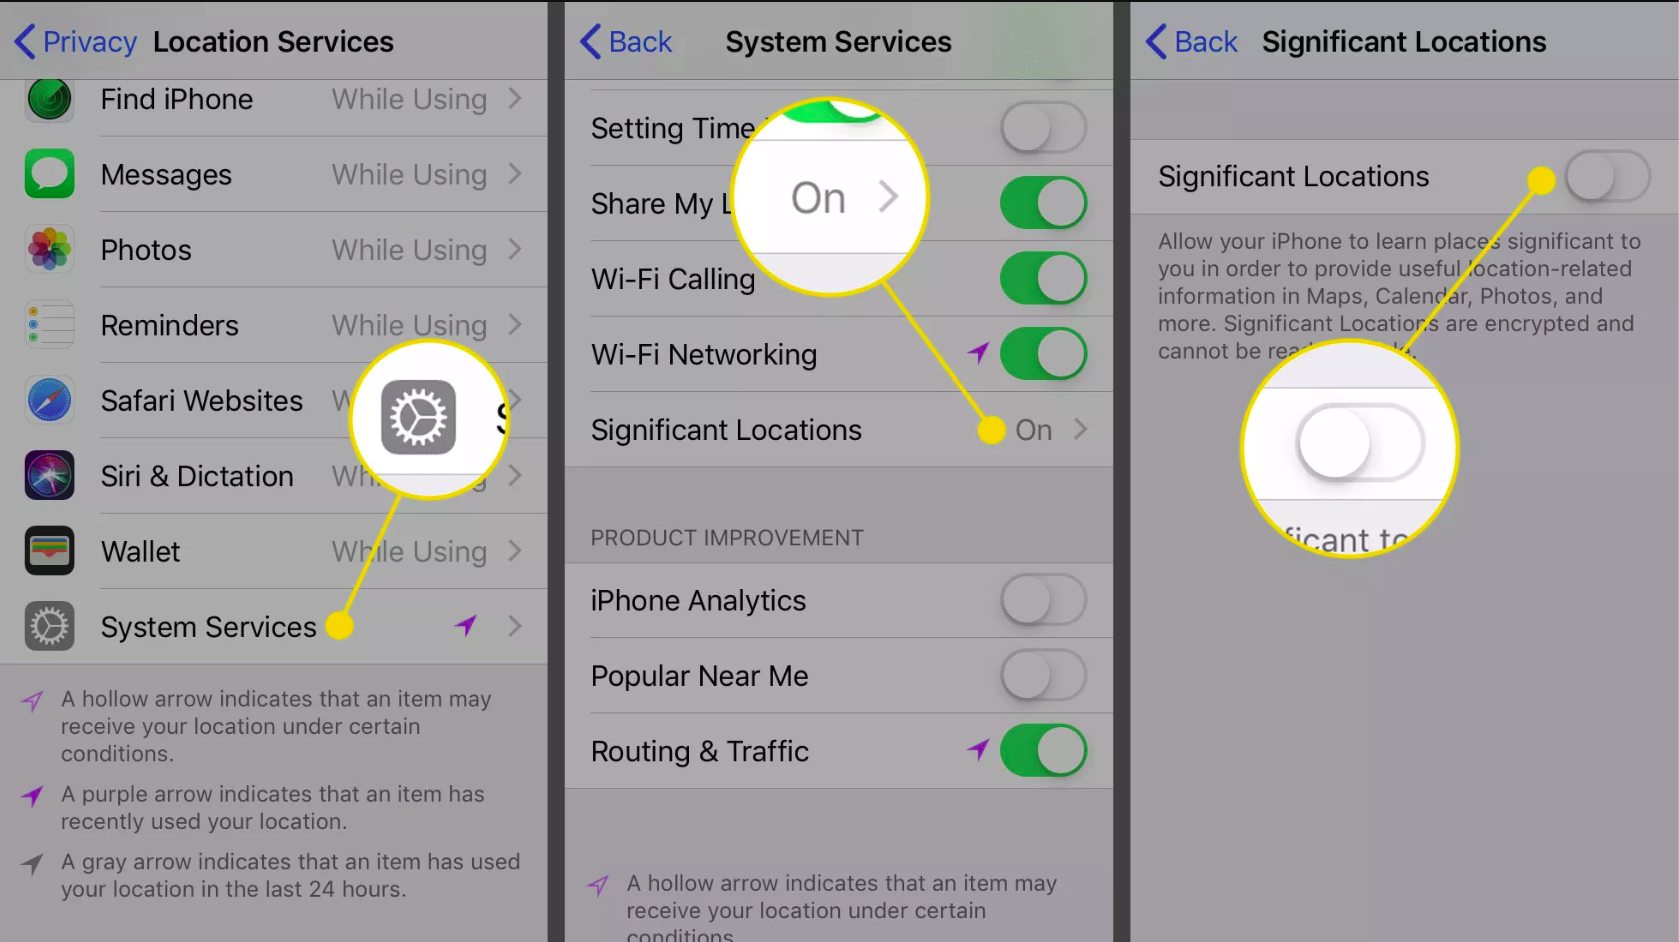
Let us know what you think about this article in the comments section.
]]>You need to open the System Information app. There are multiple ways to do this. Choose any of the followings:
- Press and hold the Option key, and click the Apple menu and System Information, or
- Click Apple menu > About This Mac > and click the Overview tab and then click the System Information button, or
- Use Spotlight and search System Information, and lastly
- On your Mac, go to Applications / Utilities / System Information
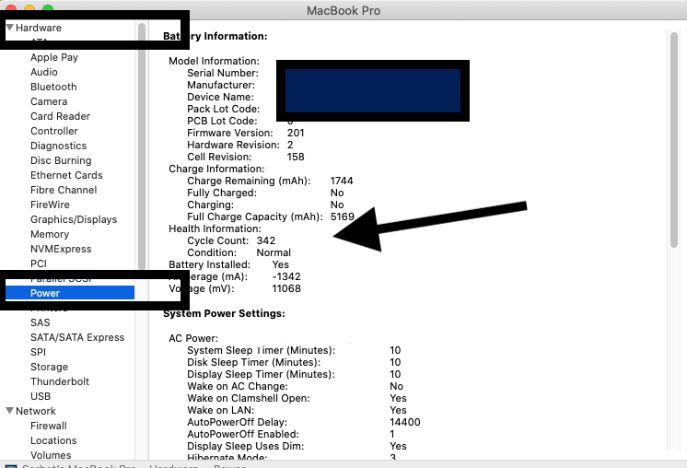
This will open a white window. This provides a summary of information about your Mac and its hardware and software.
To learn more about your battery, click Power (left menu – under Hardware). And you can see an overview of information about your battery under the ‘Battery Information’ section.
You can also save a copy of your system report by choosing File > Save.
How to check the battery cycle count on Macs
Apple makes it easy to check the battery cycle count on Macs; you just need to follow these instructions:
- Open About This Mac in the Apple Menu.
- General information about your system will appear in a small window.
- At the bottom left of that window you’ll find a button called ‘System Report’.
- Press this button, and a new window appears offering all kinds of hardware-related information about your Mac – choose the Power section.
- NB: Hold down the Option key when you press About This Mac to open the System Report directly.
- In the right-hand window in the next pane look for Health Information.
- This tells you your current cycle count and lets you know the condition of your battery.
What about the battery icon?
You can also get a general sense of battery health using the battery icon.
Option-click the battery icon in the menu bar, and you will see one of these statements:
- Normal: This is what you want to see
- Replace Soon: The battery works but needs replacing.
- Replace Now: You can keep using the battery, but don’t expect too much time between charges, and you should look to replace it.
- Service Battery: Don’t panic, you can keep using your Mac, but you really should take the machine in and get it services.