Gaining proficiency in inspecting on a Chromebook not only amplifies your browsing control but also sheds light on the complexities of web design and structure. Whether your objective is to troubleshoot issues, absorb new knowledge, or satisfy a simple technological curiosity, this capability is an indispensable component of your Chromebook toolkit.
Understanding How to Inspect on Chromebook: Delving into ‘Inspect Element’
On a Chromebook, the “Inspect Element” feature is more than just a handy tool; it’s an integral component of the Chrome Developer Tools, often referred to as DevTools. This toolset, curated meticulously for developers and inquisitive users alike, allows one to delve deep into the architecture of web pages, making sense of their structure and design nuances.
Utilizing the “Inspect Element” tool on a Chromebook means you can troubleshoot potential issues, play around with web designs in real-time, and do so without the fear of making irreversible changes. It’s the perfect sandbox environment for those eager to understand the digital intricacies of websites.
Step-by-step Guide to Inspect an Element
- Open Chrome Browser: Ensure you are using the Chrome browser on your Chromebook as it offers a seamless experience with the Inspect Element feature.
- Navigate to the Desired Page: Browse the website or page where you wish to inspect an element.
- Open the Context Menu: Hover your cursor over the element you want to inspect. Right-click (or two-finger tap on the touchpad) to reveal the context menu.
- Select “Inspect”: In the dropdown menu, find and click on the “Inspect” option. This will open the DevTools panel either on the right side or at the bottom of your Chrome browser, depending on your settings.
- Navigate Through the Source Code: In the DevTools panel, you will see the source code of the web page highlighted to the specific element you’ve selected. You can expand or collapse code snippets, modify styles, and more.
- Close DevTools: Once done, you can close the DevTools panel by clicking on the “X” icon at the top right corner of the panel.

Alternative Methods to Open DevTools
- Keyboard Shortcut: Press
Ctrl+Shift+Isimultaneously. - From Chrome Menu: Click on the three vertical dots (⋮) at the top-right corner of the browser > More tools > Developer tools.
- Right-Click Method: On any web page, simply right-click and choose “Inspect” or “Inspect Element” from the dropdown menu. This method is particularly handy for quickly accessing a specific section of the webpage you want to investigate.
- Using the URL: In the address bar, type “chrome://inspect” and press enter. This will take you to a Chrome page that displays all currently open tabs, allowing you to select which one you want to inspect.
Understanding how to inspect on Chromebook encompasses more than just the basics of opening the DevTools. The multiple pathways highlighted above ensure you have flexible and efficient ways to delve into the structural depths of web pages. Whether you’re debugging, tweaking designs, or simply learning, these methods make the process seamless and user-friendly.
Exploring the Features of DevTools
While the primary function of the “Inspect” feature is to view the source code and styles of a particular element, DevTools offers various tabs to explore:
- Elements: View and modify the structure and styling of web content.
- Console: View logs, errors, and interact with the JavaScript on the page.
- Sources: Debug your JavaScript code.
- Network: Monitor network requests and responses.
- Performance: Analyze runtime performance.
Importance of Inspecting on a Chromebook
In the age of digital transparency, having the ability to inspect elements on a web page has become more crucial than ever, particularly for those using Chromebook laptops. But why is this feature so indispensable?
1. Uncover Hidden Information: At a surface glance, web pages display tailored content for the general user. However, a wealth of information lies beneath. By inspecting elements, one can unveil this hidden data, offering deeper insights into the webpage’s structure and functionality.
2. Keyword Exploration: One of the primary advantages is the ability to search for specific keywords within the webpage’s code. This is especially beneficial for SEO analysts and digital marketers who want to understand keyword placements on a site.
3. Modify and Experiment with Web Design: Have you ever wondered how a webpage might look with a different color scheme or font? By editing the CSS and HTML files directly from the inspection tool, you can temporarily alter the design of the webpage, enabling a real-time preview of potential modifications.
4. Dive into the Console Panel: The console isn’t just a display of codes; it’s a playground for developers. You can test new features, run scripts, and interact with the webpage in ways the general viewer can’t.
5. Access the Blueprint – Source Code: The source code is essentially the blueprint of a webpage. By viewing it, one gains insights into how the webpage is constructed, the technologies implemented, and the hierarchy of elements.
6. Debugging with Precision: Errors and glitches are inevitable in the digital realm. The inspect tool facilitates efficient debugging, helping developers identify and resolve issues promptly.
7. Image Retrieval: Beyond text and code, inspecting allows users to access and download images from a webpage, even those that might not be readily downloadable through traditional means.
In essence, understanding how to inspect on a Chromebook is akin to possessing a magnifying glass for the digital world. Whether you’re a developer, a designer, or just an inquisitive user, the tool enriches your browsing experience, granting a clearer perspective of the vast and intricate web landscape.
How to Unblock the Inspect Element Option on Chromebook
Gaining access to a web page’s underlying code can be insightful, especially for those keen on web development or troubleshooting. The “Inspect Element” feature serves this purpose. However, on some Chromebook devices, especially those provided by educational institutions, this option may be restricted. If you’re pondering on how to unblock the Inspect Element option on Chromebook, here’s a comprehensive guide.
Why Might the Inspect Element Be Blocked?
Often, Chromebooks issued by schools or organizations have certain administrative restrictions to ensure that the devices are used purely for academic or official purposes. One of these potential restrictions could be disabling the Inspect Element feature.
Steps to Unblock the Inspect Element via Disabling JavaScript:
While there isn’t a direct method to unblock the inspect element on Chromebooks, an alternative route involves disabling the JavaScript option. Here’s how:
- Access Chrome Settings: Launch your Chrome browser. In the top right corner, you’ll see a three-dot menu icon. Click on it to access additional options.
- Head to Site Settings: Within the dropdown, type in or search for “javascript.” Click on “Site Settings” that appears in the results.
- Navigate to the JavaScript Option: In the list of site settings, locate and select the “JavaScript” menu.
- Disable JavaScript: To block all sites from running JavaScript, choose the “Don’t allow sites to use JavaScript” option.
- Disable JavaScript for Specific Sites (Optional): If you only want to disable JavaScript for certain websites, you can select the customized behavior option. Then click on “add site” and specify the sites where you wish to block JavaScript.
After these steps, when you right-click on a website, the “Inspect” option should now be visible and accessible.
What’s the Value of the Inspect Element?
The Inspect Element tool is more than just a peek behind the digital curtain. It’s a developer-centric feature, enabling users to view, analyze, and even modify web code temporarily. This facilitates an understanding of web structure, design, and helps in identifying areas of improvement or issues.
What If These Steps Don’t Work?
If the aforementioned method doesn’t grant access to the Inspect Element feature, it might be due to deep-rooted administrative restrictions. In such cases, it’s advisable to contact the Chromebook’s administrator for permissions or consider acquiring a personal Chromebook for unrestricted access.
In conclusion, while administrative barriers might pose challenges in accessing certain features, understanding how to unblock the Inspect Element option on Chromebook can help bridge the gap between user curiosity and the vast world of web development.
FAQs
Can I save the changes made using Inspect Element permanently?
No, changes made using the Inspect Element tool are temporary and are lost once the page is refreshed.
Is it legal to inspect elements on all websites?
Inspecting an element is generally legal as you’re viewing publicly available source code. However, modifying or using the content without permission might infringe on copyrights or terms of service.
Why can’t I see the “Inspect” option in my context menu?
Ensure you are using the Chrome browser. If the issue persists, it might be due to certain restrictions placed by administrators or the website itself.
Can I use DevTools on other browsers in a Chromebook?
While this guide focuses on Chrome, browsers like Firefox and Edge also offer developer tools with similar features.
Can I learn web development using the Inspect Element tool?
Absolutely! Many web developers started their journey by exploring and understanding web structures using this tool. It’s a great way to see how elements relate and how styles are applied.
Conclusion
Understanding how to inspect on a Chromebook is a simple yet powerful skill. Whether you’re curious about web design, troubleshooting a page, or just experimenting, the Inspect Element feature on your Chromebook is a valuable tool to delve into the intricacies of web development. Armed with this knowledge, you’re now equipped to explore the vast world of web content like never before.
s you with greater control over your browsing experience but also provides invaluable insights into web design and structure. Whether you’re troubleshooting, learning, or simply satiating your curiosity, mastering this skill is a noteworthy addition to your digital toolkit on a Chromebook.
If you’ve enjoyed understanding how to inspect elements on a Chromebook, you might be intrigued by how similar functionalities work on popular applications like Discord. Delve deeper into digital inspection with our comprehensive guide on “How to Inspect Element Discord: A Step-by-Step Guide”. Learn how to navigate and modify elements within the Discord app, enhancing your expertise in web diagnostics and customization. Don’t miss out on mastering another essential digital skill!
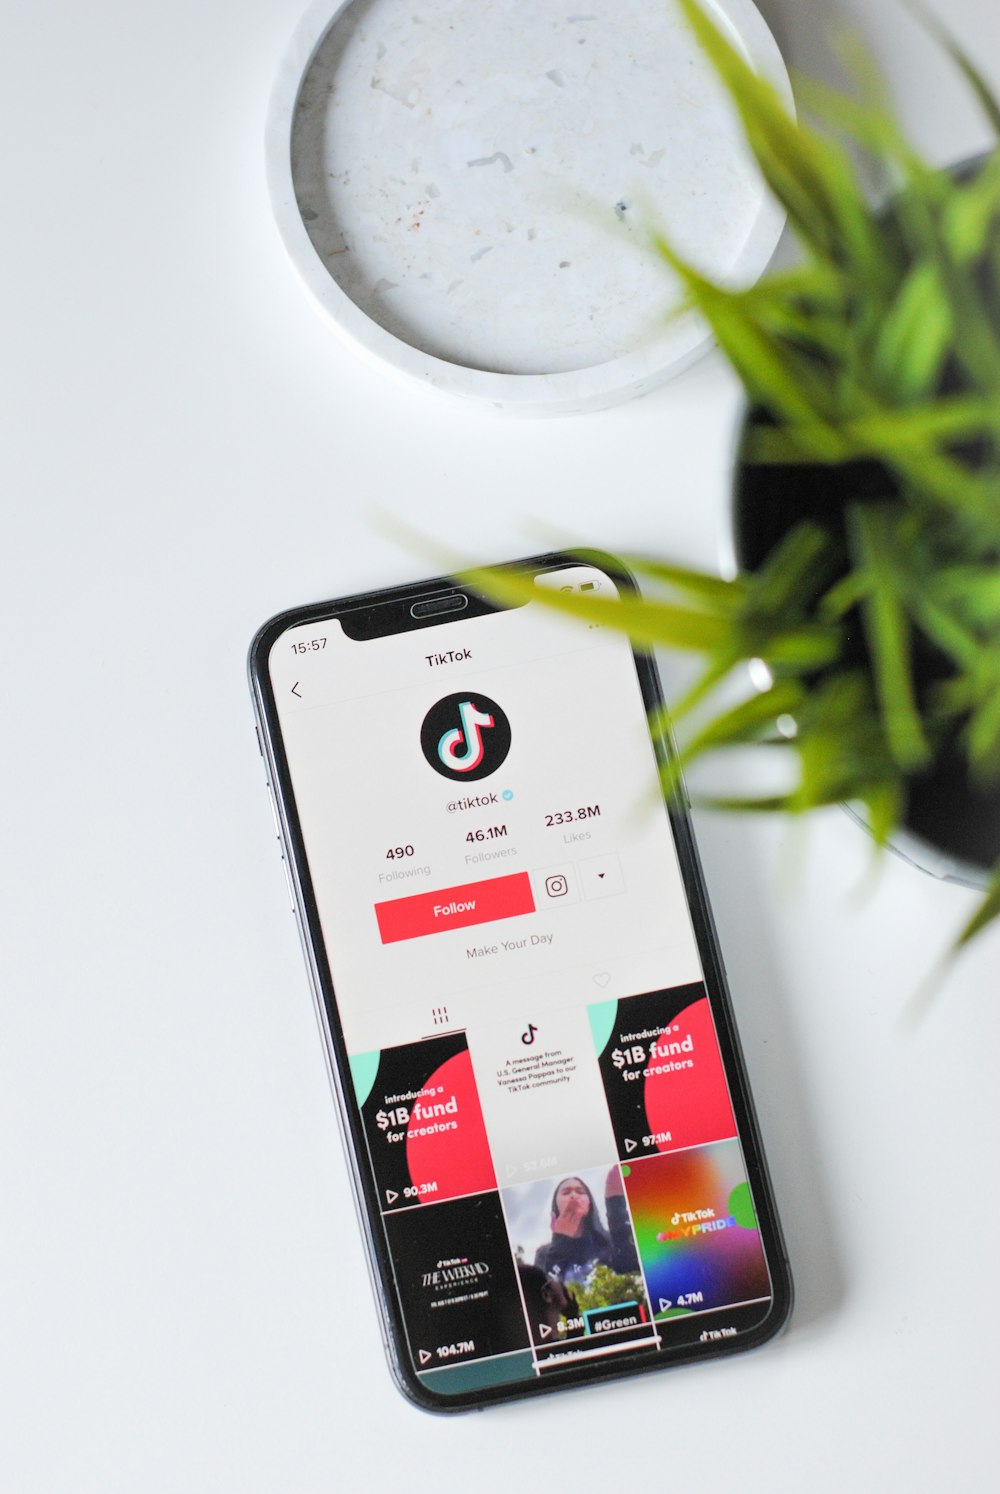
]]>Understanding the TikTok Algorithm: Dive Deeper
TikTok’s explosive growth is largely driven by its powerful recommendation algorithm. This system, called the “For You Page” or FYP, decides which videos get shown to which users, and understanding it can significantly improve your reach on the platform. Let’s delve deeper into its mechanics.
1. Personalization and Relevance
- User Interactions: The algorithm pays close attention to the videos you like, share, and comment on. It uses this data to understand your preferences and serve content tailored to your interests.
- Video Information: Details like captions, sounds, and hashtags help the algorithm categorize content. For instance, using a trending song or hashtag can increase the chances of your video being shown to more users.
- Account & Device Information: The type of device you’re using, your language preference, and location play a part in determining which videos appear on your FYP.
2. User Behavior Analysis
- Completion Rate: If users watch your video from start to finish, it indicates strong engagement. Videos with high completion rates are more likely to be promoted.
- Rewatches: If a viewer watches your video multiple times, it’s a strong signal of quality content.
3. Content Freshness
- New Content Boost: TikTok is known to give a slight boost to fresh content. This ensures that the FYP remains dynamic and that newer creators have a chance to be discovered.
4. Negative Indicators
- Skip Rate: If users regularly skip your videos shortly after they start, it’s a negative signal to the algorithm.
- Muted Videos: If a user mutes your video or scrolls past quickly, these can be taken as indicators that the content was not engaging.
5. Diversification
- Avoiding Echo Chambers: To avoid creating content bubbles, TikTok’s algorithm occasionally introduces users to new topics or trends they haven’t interacted with before.
6. Creator Balance
- Democratization of Content: Unlike some platforms where established creators dominate, TikTok often promotes videos from lesser-known creators to give them a fair chance at gaining visibility.
2. Create High-Quality Content
In the fast-paced world of TikTok, where users scroll through content at lightning speed, the quality of your videos can make the difference between a scroll past and a pause to engage. Video Quality is paramount. High-resolution videos not only look more professional but also showcase the details more vividly, be it the intricacies of a dance move or the nuances of a story. Good lighting ensures that viewers can clearly see every aspect of the video, and clear audio ensures your message, music, or dialogues are heard without strain. Grainy visuals or muffled sound can quickly deter viewers, leading them to swipe away.
However, technical aspects aside, the soul of your content lies in its Authenticity. The raw, genuine moments often outshine the most polished performances, because authenticity creates a connection. When viewers sense that a creator is genuine, they are more inclined to engage, relate, and even become loyal followers. On a platform where millions are vying for attention with varied content, being yourself can be your unique selling point. It’s an invitation to viewers to get to know the real you, and that’s a bond scripted performances rarely achieve.
- Video Quality: Always aim for high-resolution videos with good lighting and clear audio.
- Authenticity: Be yourself. Authenticity resonates with viewers more than a scripted performance.

3. Engage with the TikTok Community
- Interact: Respond to comments on your videos, engage with content from other creators, and participate in discussions.
- Ask Questions: Pose questions to your audience to spark engagement and conversations.
Engagement is the lifeblood of social media, and TikTok is no exception. As a platform built on dynamic interactions and shared experiences, TikTok thrives on community engagement. Delving deep into community interactions not only boosts your visibility but also helps establish genuine connections with your followers and fellow creators.

1. Respond to Comments: One of the quickest ways to build rapport with your audience is by actively responding to comments on your videos. This shows that you value their input and are eager to communicate. A thoughtful reply or even a simple emoji can make a viewer feel acknowledged.
2. Collaborate with Others: Engaging doesn’t mean solely interacting with your followers. Reaching out to fellow TikTokers for collaborations, duets, or shared challenges can broaden your reach and introduce you to new audiences. This mutual appreciation often leads to organic growth for both parties involved.
3. Participate in Community Challenges: TikTok often witnesses waves of trending challenges. Joining these trends connects you with a broader community, shows that you’re current, and displays a fun side that resonates with many users.
4. Attend TikTok Events or Live Sessions: TikTok occasionally hosts online events, workshops, or live sessions. Participating in these events allows you to engage with a broader community, learn from top creators, and even get insights directly from TikTok representatives.
5. Provide Value: Whether it’s through tutorials, insightful commentary, or sharing experiences, providing value can lead to deeper engagement. When viewers feel they gain something by watching your content, they’re more likely to engage and even share it with others.
6. Create a Positive Space: The TikTok community thrives on positivity. Encouraging positive interactions, promoting constructive discourse, and celebrating diversity can make your channel a magnet for like-minded individuals seeking uplifting content.
Engaging with the TikTok community is about creating a two-way street. It’s not just about amassing followers but cultivating relationships, understanding trends, and becoming an active participant in the platform’s ever-evolving culture. As you immerse yourself in the community, you’ll find that growth on TikTok is as much about giving as it is about receiving.
4. Leverage TikTok Trends
Leveraging TikTok Trends is pivotal for creators seeking to amplify their reach on the platform. As a hub of innovation and creativity, TikTok constantly sees the emergence of new songs, dance challenges, and viral moments. By tapping into these trends, creators can ride the wave of popularity, ensuring their content remains relevant and fresh. However, the key is to not merely mimic, but to infuse one’s unique style into trending content, creating a perfect blend of relatability and originality that resonates with both new and existing followers. Read more about TikTok Trends here.
- Stay Updated: Keep an eye on trending songs, challenges, and effects. Incorporate them creatively into your content.
- Innovate: Put your unique spin on trending content to stand out.
5. Collaborate with Other TikTokers
Collaborating with other TikTokers is a strategic way to diversify content and tap into new audience segments. By joining forces with fellow creators, individuals can not only share insights and creative ideas but also merge with their followers, allowing for mutual growth. These collaborations, whether through duets, shared challenges, or co-created content, foster community spirit and present an opportunity to showcase versatility, ensuring both creators benefit from a broader reach and richer engagement.
- Duets & Stitches: Utilize these features to collaborate with others.
- Joint Challenges: Team up with other creators to launch challenges, attracting both audiences.
6. Use Effective Hashtags
In the realm of TikTok, hashtags serve as navigational beacons, guiding users toward content that aligns with their interests. Here’s how to harness their power effectively:
- Research is Key: Before posting, research trending and niche-specific hashtags. This can increase the discoverability of your content amidst a sea of videos.
- Be Relevant: While it’s tempting to use popular hashtags, always ensure they’re relevant to your content. Misleading hashtags can deter viewers and impact engagement rates.
- Mix Broad and Specific Hashtags: Combine broader trending hashtags with more specific ones. While the former increases visibility among a vast audience, the latter targets a more niche group, honing in on viewers genuinely interested in your content.
- Limit Your Use: Overloading your captions with too many hashtags can seem spammy. Strike a balance to maintain a professional and clean look.
- Analyze and Adapt: Keep track of which hashtags drive the most engagement to your videos. Adjust your strategy based on what’s working, always staying updated with the ever-changing TikTok landscape.
In essence, effective hashtag use is not just about visibility but about reaching the right audience who’ll value and engage with your content.
7. Consistency is Key
In the bustling world of TikTok, consistency stands as the cornerstone of sustained growth and engagement. Regular posting not only keeps your content in the forefront of your audience’s mind but also signals to the platform’s algorithm your commitment, often leading to better visibility and recommendations. Beyond just frequency, consistency also pertains to the quality and style of content, allowing followers to know what to expect and fostering a sense of brand loyalty among viewers. In this dynamic digital age, while trends may come and go, it’s the consistent creators who carve a lasting niche for themselves.
- Regular Posting: Establish a consistent posting schedule. It doesn’t have to be daily, but regularity helps.
- Stay Active: Engage regularly, even if you’re not posting.
8. Cross-promote on Other Platforms
Cross-promotion on various social platforms magnifies your TikTok presence by capitalizing on established audiences elsewhere. By sharing snippets or highlights of your TikTok videos on platforms like Instagram, Twitter, or Facebook, you invite diverse audience sets to engage with your content. This interconnected web of promotions not only drives traffic from one platform to another but also reinforces your brand identity across the digital landscape, ensuring a cohesive and broad-based engagement strategy that maximizes reach and recognition.
- Link Accounts: Connect your TikTok account to other social media platforms.
- Share Snippets: Post snippets of your TikTok videos on platforms like Instagram, Twitter, or Facebook to drive traffic.
Telegram isn’t just a messaging app; it’s a powerful tool for community cultivation. By creating a dedicated group for your TikTok followers, you can foster deeper connections, share exclusive content, and engage in real-time discussions. This platform serves as a bridge, extending the ephemeral interactions of TikTok into sustained, meaningful conversations. Plus, it provides a seamless way to cross-promote and direct your audience to further resources or articles, enriching their experience with your brand. You can read about more here
9. Engage in Challenges
TikTok challenges are a cultural phenomenon that has cemented their place as one of the platform’s most influential and engaging features. Participating in these challenges can skyrocket your visibility, introduce you to new audiences, and solidify your presence as a trend-savvy creator. Here’s why and how you should make the most of them:
1. Ride the Trend Wave: Challenges often become viral sensations on TikTok. Engaging in a trending challenge can place your content in front of millions, giving you a slice of that virality pie.
2. Showcase Creativity: While challenges come with a set theme or format, there’s always room for a personal twist. Use them as an opportunity to showcase your unique style or perspective, setting your content apart from the masses.
3. Connect with the Community: Challenges are communal by nature. By participating, you’re joining a global conversation, making your content relatable to a wider audience and fostering a sense of belonging within the TikTok community.
4. Discoverability Boost: TikTok often dedicates specific discovery pages or sections for trending challenges. Engaging in one can increase the chances of your content being featured there, driving a surge in views and potential followers.
5. Collaborative Opportunities: Challenges can be a great way to collaborate with other TikTokers. You can engage in duets, stitch videos, or even create team-based challenges, further expanding your reach.
6. Consistent Content Ideas: Stumped on content ideas? Challenges offer a ready-to-use format. Engaging in different challenges ensures your content calendar remains full, and your posts are consistent.
Remember, while challenges offer a structured format, it’s crucial to remain authentic. Blindly following trends without adding your unique touch can make the content feel insipid. So, while you hop on the challenge bandwagon, ensure you’re also offering something fresh and genuine to your viewers.
Conclusion
Gaining followers on TikTok, like any other platform, requires dedication, creativity, and a keen understanding of the platform’s dynamics. Focus on creating genuine content, engaging with your community, and staying updated with the latest trends. Remember, every large TikTok influencer started with zero followers. With consistency and effort, you can make your mark too.
]]>1. Location Sharing: Guard Your Whereabouts
The allure of sharing your location with close friends is undeniable, yet caution is necessary. It’s essential to only share your whereabouts with people you trust. If you find location sharing bothersome, remember that you can always turn it off in the settings.
Furthermore, WhatsApp offers the flexibility to disable location sharing selectively, allowing you to retain privacy even among specific groups or individuals. When you deactivate location sharing:
- The concerned party won’t be able to track your current location.
- They will still have access to your last shared location until they modify their own settings.
- Step 1: Open WhatsApp and go to the chat with the person or group you want to adjust location sharing for.
- Step 2: Tap on the recipient’s/group’s name at the top of the chat window to access their profile.
- Step 3: Find the “Location” option and choose from the available settings: “Live Location,” “Share Live Location,” or “Send Your Current Location.”
- Step 4: Select “None” if you want to disable location sharing entirely for that person/group.
- Step 5: Repeat these steps for each person or group you want to manage location sharing for.
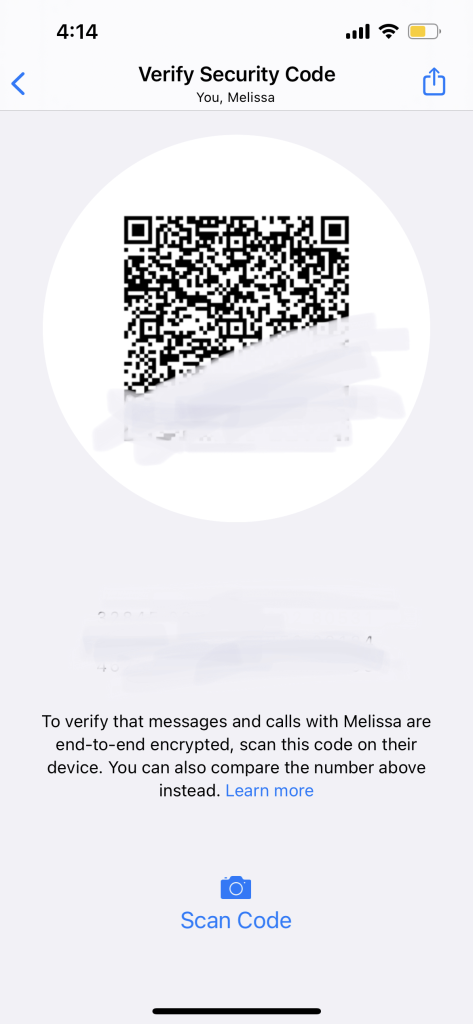
2. Encryption: A Shield for Private Conversations
Privacy and security thrive on encryption, and WhatsApp understands this. Every private conversation benefits from end-to-end encryption, safeguarding your messages from prying eyes. This feature is activated by default, ensuring your conversations remain exclusively between you and your intended recipient.
- Step 1: Open WhatsApp and navigate to the chat you want to secure.
- Step 2: Look for the lock icon at the top of the chat window; this indicates end-to-end encryption is active.
- Step 3: Engage in your private conversation knowing that your messages are protected by encryption.
3. Incognito Mode: Stealthy Conversations
When discretion is paramount, WhatsApp’s Incognito mode proves invaluable. This feature allows you to maintain private chats hidden from others using the app. Whether you’re sending confidential messages or simply want to converse without alerting anyone, Incognito mode has you covered.
- Step 1: Launch WhatsApp and open the chat with the person you want to message privately.
- Step 2: In the chat window, tap on the recipient’s name at the top.
- Step 3: Choose “Custom Notifications.”
- Step 4: Toggle on “Custom Notifications” and select options like “Hide Notification” or “Silent.”
- Step 5: Return to the chat, and your messages will be discreetly received without notifications.
4. Preventive Measures: Know Your Sharing Boundaries
Awareness is key to preserving your privacy. Remember that whatever you share on WhatsApp is visible to your recipients. However, this doesn’t mean you’re sharing everything with everyone. By adjusting your privacy settings, you can manage who sees your content. If you’re using WhatsApp for sensitive discussions, consider enhancing your privacy with WireGuard VPN for end-to-end encrypted chats and added protection for your personal information.
- Step 1: Access WhatsApp’s settings by tapping the three dots in the upper-right corner of the main screen.
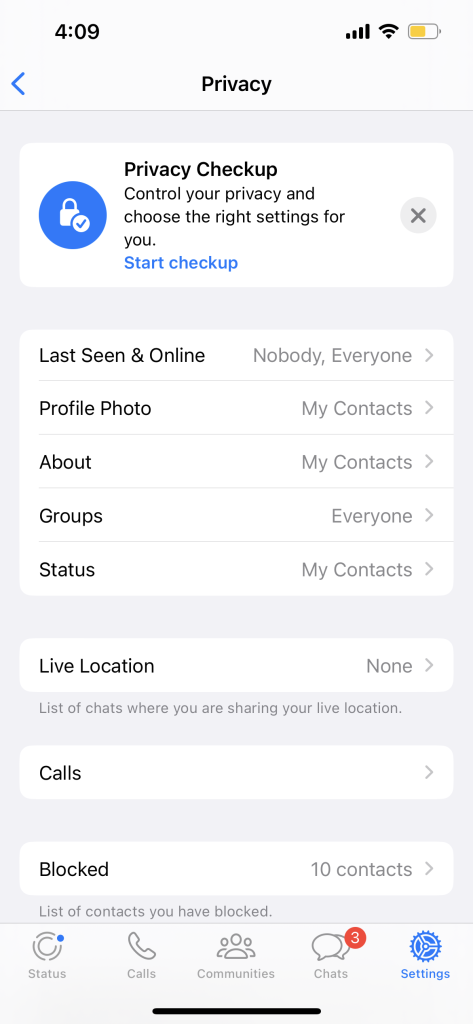
- Step 2: Select “Account,” then “Privacy.”
- Step 3: Explore settings like “Last Seen,” “Profile Photo,” “About,” and “Status.”
- Step 4: Choose from options like “Everyone,” “My Contacts,” or “Nobody” to control who sees your information.
- Step 5: Review and adjust these settings periodically to align with your privacy preferences.
5. WhatsApp Privacy Landscape: Room for Improvement
While WhatsApp offers valuable privacy features, some users might seek more comprehensive control over their data. The ability to hide your contacts list or restrict message visibility is currently limited. If you’re looking for heightened privacy options, explore alternatives like Wickr Me or Signal, which provide greater customization and control over who accesses your information.
- Step 1: Research alternative messaging apps like Wickr Me or Signal.
- Step 2: Download and install the chosen app from your app store.
- Step 3: Set up your account and explore the advanced privacy features offered.
- Step 4: Import your contacts if desired and start using the app for more privacy-conscious communications.
- Step 5: Keep informed about updates and improvements to ensure continued privacy.
6. Disappearing Messages: Enhancing Conversational Privacy
WhatsApp’s Disappearing Messages feature offers an added layer of privacy by allowing you to send messages that automatically disappear after a set period. This feature is perfect for discussions that you’d rather not have lingering in chat history. Here’s how to use it:
- Step 1: Open the chat where you want to enable Disappearing Messages.
- Step 2: Tap the recipient’s/group’s name at the top of the chat window to access their profile.
- Step 3: Scroll down and find the “Disappearing Messages” option.
- Step 4: Select “On” to activate the feature for that specific chat.
- Step 5: Confirm your choice, and messages sent in this chat will automatically disappear after the predetermined time (7 days) unless manually saved.
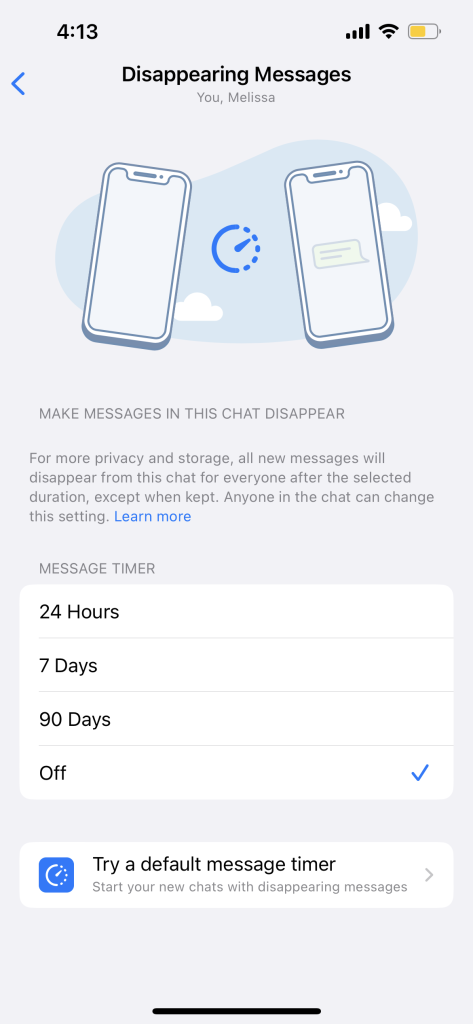
By using Disappearing Messages, you can engage in sensitive discussions or share temporary information without leaving a digital trail. It’s an excellent way to maintain privacy while communicating through WhatsApp.
In addition to mastering WhatsApp privacy settings, there’s a treasure trove of handy tips and tricks that can enhance your messaging experience. Discover these hidden gems that can make your conversations more efficient and enjoyable. From customizing notifications to using chat shortcuts, and even sending self-destructing messages, this collection of 15 WhatsApp hacks will take your messaging game to the next level. Whether you’re a casual user or a seasoned pro, these cool tricks are sure to impress and streamline your WhatsApp interactions. Check out our detailed guide on Unlock the Best WhatsApp Hacks: 15 Cool Tips and Tricks You Didn’t Know to explore these fantastic WhatsApp hacks and become a messaging maven.
In Conclusion: Empowering WhatsApp Privacy
By following these guidelines, you can harness the power of WhatsApp while retaining control over your personal information. As you connect with friends and family, prioritize your privacy and security. As technology continues to evolve, the onus is on us to adapt and ensure that our digital interactions align with our privacy preferences.
WhatsApp has transcended mere messaging, evolving into a global communication phenomenon. With its user-friendly interface and robust features, it has revolutionized the way we connect. From sharing cherished memories through multimedia to real-time conversations spanning continents, WhatsApp empowers us to bridge distances effortlessly. Discover more about the app that’s reshaping modern communication by visiting Whatsapp Website. Join the millions who have made WhatsApp an integral part of their digital lives.
]]>Elevating Your Server Experience: Expert Discord Tricks and Tips
As we discussed in our guide on building and managing online communities, creating a well-organized server is essential for fostering engagement. By implementing the strategies outlined in “Unlocking the Power of Discord Online Communities,” you’ve already taken significant steps. Now, let’s delve into expert Discord tricks and tips that will further elevate your server’s functionality and member satisfaction.
1. Server Organization with Categories
Keep your servers tidy by using categories to group related channels together. Right-click on a server and create a category to neatly organize channels for different topics, projects, or interests.
Discord servers can quickly become chaotic as more channels are added. That’s where categories come in handy. Here’s how to organize your servers with ease:
- Step 1: Right-click on your server’s name in the server list on the left-hand side of Discord.
- Step 2: Select “Create Category.”
- Step 3: Name your category to represent the topic or purpose of the channels it will contain.
- Step 4: Drag and drop existing channels into the category.
- Step 5: To keep things even more organized, you can nest categories within categories by dragging them underneath each other.
Creating categories ensures that related channels are grouped together, making it simpler for members to find and engage in discussions relevant to their interests.
2. Customize with Roles and Permissions
Create roles to define user groups and set specific permissions for each role. Whether you’re a server owner or administrator, managing roles ensures that members have appropriate access and privileges.
Roles and permissions are pivotal for maintaining order within your server and providing the right level of access to different members. Here’s how you can set them up:
- Step 1: Go to your server settings by clicking on the server name and selecting “Server Settings.”
- Step 2: Navigate to the “Roles” tab on the left.
- Step 3: Create new roles by clicking the “+” button. Give them meaningful names and assign specific permissions.
- Step 4: Under the “Members” tab, assign roles to individual members by clicking on their name.
- Step 5: Adjust the permissions for each role by toggling on/off the relevant options.
With well-defined roles and permissions, you can ensure that members have the appropriate capabilities while maintaining a secure and organized environment.
3. Embrace Server Folders
If you’re part of numerous servers, server folders are your best friend. Simply drag and drop servers into folders to reduce clutter and improve navigation.
Server folders are a savior if you’re a part of multiple servers. Here’s how to use them effectively:
- Step 1: Click on a server and drag it over another server that you want to group together.
- Step 2: Release the mouse to create a server folder.
- Step 3: Name the folder to represent the theme or purpose of the servers within it.
- Step 4: Drag more servers into the folder as needed.
This feature streamlines your Discord experience by keeping related servers neatly organized and easily accessible.
4. Express with Emojis
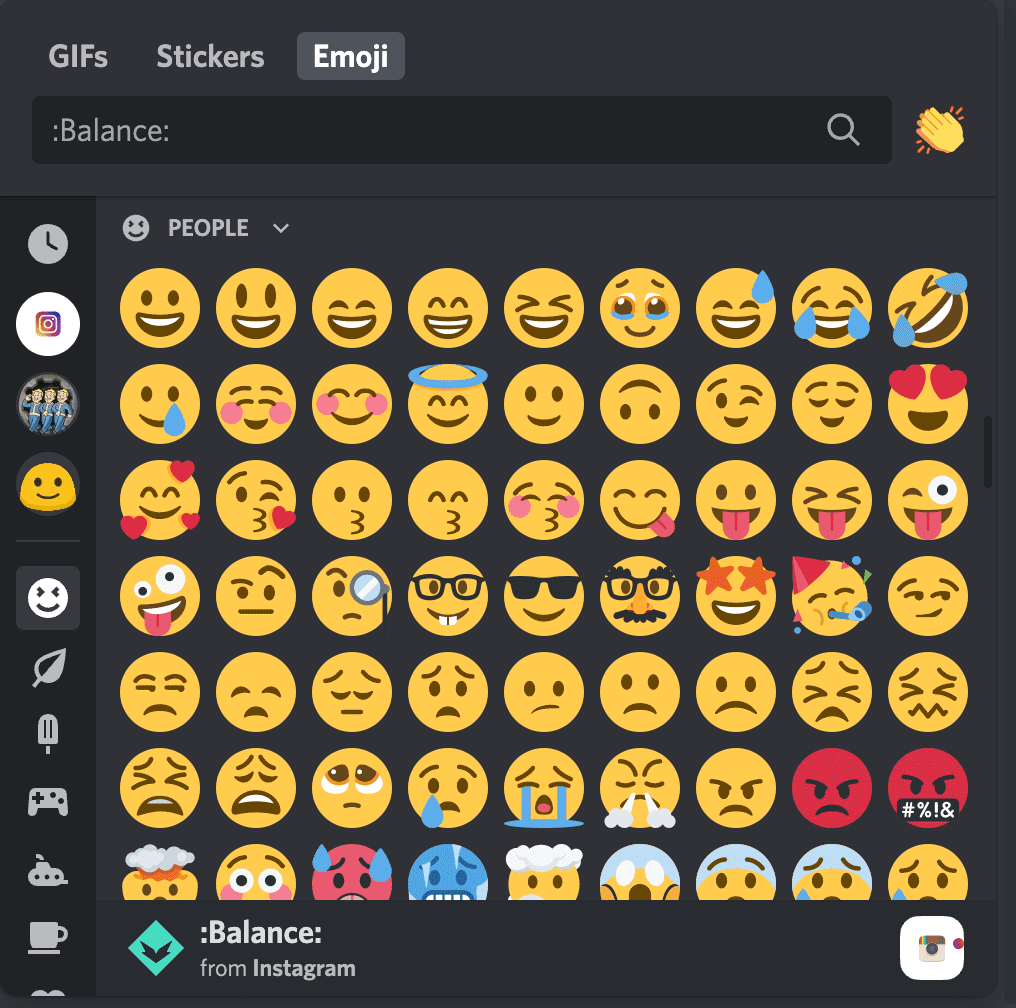
Emojis add personality to your messages. Use custom emojis or leverage Discord’s vast library to add flair and emotion to your conversations.
Emojis add a dash of personality to your messages. Here’s how to use them:
- Step 1: While typing a message, click on the smiley face icon in the text box.
- Step 2: Browse and select emojis from the menu.
- Step 3: You can also use custom emojis by typing their names (e.g., :heart:) if your server has them.
Emojis are a fun and visual way to convey emotions and reactions within your conversations.
5. Markdown Mastery
Markdown formatting isn’t just for programmers. Use asterisks for italics, double asterisks for bold, backticks for code, and underscores for underline.
Markdown allows you to format your messages creatively. Here’s how to use some basic Markdown formatting:
- Italics: Enclose text in single asterisks or underscores (*italic* or _italic_).
- Bold: Enclose text in double asterisks or underscores (**bold** or __bold__).
- Code: Enclose text in backticks (`code`).
- Underline: Use double underscores before and after the text (__underline__).
These formatting options help you emphasize your messages and make them visually engaging.
6. Rich Presence for Gamers
Gamers, rejoice! Discord’s Rich Presence feature lets you showcase your current game, making it easier to find like-minded players to join your gaming sessions.
Discord’s Rich Presence feature showcases your current game to others. Here’s how to enable it:
- Step 1: Ensure Discord and the game are both open.
- Step 2: Discord will detect the game and display it in your status.
Rich Presence not only lets others know what you’re playing but also invites them to join your gaming session.
7. Quick Switching with Ctrl/Cmd + Arrow
Navigate through your server channels effortlessly using the shortcut Ctrl (Cmd) + Arrow. No more tedious scrolling – just quick jumps to stay engaged.
Navigating through channels can be a breeze with shortcuts:
- Step 1: Click on a server.
- Step 2: Use Ctrl (Cmd) + Left/Right Arrow keys to navigate between channels.
- Step 3: Use Ctrl (Cmd) + Up/Down Arrow keys to move through channels in your list.
These shortcuts save time and keep you engaged with the content that matters most.
8. Personalize with Themes
Discord offers various themes to suit your aesthetic preferences. Access them through User Settings > Appearance and select the one that resonates with you.
Customize Discord’s appearance to match your style:
- Step 1: Go to User Settings (gear icon) > Appearance.
- Step 2: Choose a theme from the options available.
- Step 3: The interface will instantly update to the selected theme.
Select a theme that resonates with your aesthetic preferences for a visually appealing experience.
9. Mute, Deafen, and Push-to-Talk Shortcuts
Become a keyboard ninja by using shortcuts for muting (Ctrl + Shift + M), deafening (Ctrl + Shift + D), and push-to-talk (Ctrl + Shift + P).
Manage your voice settings efficiently with shortcuts:
- Step 1: Press Ctrl + Shift + M to mute/unmute your microphone.
- Step 2: Press Ctrl + Shift + D to deafen/undeafen your audio.
- Step 3: Press Ctrl + Shift + P to enable/disable push-to-talk.
These shortcuts give you quick control over your voice settings during conversations.
10. Server-Specific Emoji Reactions
React uniquely! Use server-specific emojis to add distinctive reactions to messages in different communities.
Add server-specific emojis to reactions with these steps:
- Step 1: Hover over a message you want to react to.
- Step 2: Click the smiley face icon that appears.
- Step 3: Choose an emoji from the server’s collection.
Server-specific emojis allow you to add a unique touch to your reactions.
11. Integrate Bots for Enhanced Functionality
Bots can be incredibly useful. Whether you want to play music, moderate chats, or automate tasks, there’s a bot for almost everything.
Adding bots can amplify your server’s capabilities:
- Step 1: Search for a bot that suits your needs on a bot listing website.
- Step 2: Click on the bot and follow the instructions to invite it to your server.
- Step 3: Configure the bot’s settings using its designated commands.
Bots bring automation and utility to your server, enhancing user experience.

How to Add Bots to a Discord Server: Step-by-Step Guide
12. Direct Message Grouping
Keep your DMs organized by grouping related conversations. Simply drag and drop one DM on top of another to create a group.
Organize your DMs with ease:
- Step 1: Click and hold a DM.
- Step 2: Drag the DM over another one to create a group.
- Step 3: You can add more DMs to the group by dragging them in.
Grouping related DMs keeps your private conversations organized and accessible.
13. Search Smartly
Locate old messages with ease using Discord’s search function. Narrow down results by using keywords, user mentions, or timeframes.
Locate old messages efficiently:
- Step 1: Click on the magnifying glass icon in the top-right corner.
- Step 2: Enter keywords, user mentions, or timeframes to filter results.
- Step 3: Discord will display messages that match your search criteria.
Effective search helps you find the information you need quickly.
14. In-App Notifications Management
Tame the notification beast by customizing notification settings for each server. Right-click on a server’s icon to access notification options.
Customize notification settings for each server:
- Step 1: Right-click on the server’s icon in the server list.
- Step 2: Choose “Notification Settings.”
- Step 3: Adjust notification preferences according to your needs.
Tailoring notifications keeps you informed without overwhelming you with alerts.
15. Video Calls and Screen Sharing
Discord isn’t just about text and voice – it’s also a powerful video conferencing tool. Initiate video calls and screen sharing to collaborate effectively.
Engage in video calls and screen sharing for collaboration:
- Step 1: Create or join a voice channel in a server.
- Step 2: Click on the video camera

Discord continues to evolve, offering an ever-expanding array of features to enhance your online interactions. By mastering these tricks and tips, you’ll elevate your Discord experience, whether you’re coordinating projects, connecting with friends, or immersing yourself in the world of gaming. Stay connected, stay organized, and make the most of this dynamic platform.
Advanced Customization with Discord: Exploring Beyond the Surface
While we’ve covered a plethora of expert Discord tricks and tips to enhance your experience, there’s even more you can explore. For those who are curious about delving into the technical aspects of Discord’s customization, we have a comprehensive guide titled “How to Inspect Element Discord: A Step-by-Step Guide.” This article provides a detailed walkthrough for users interested in understanding the underlying structure of Discord’s interface and making advanced customizations. If you’re ready to take your Discord experience to a whole new level, make sure to check out our step-by-step guide for a deeper dive into the world of customization.
Conclusion
Incorporating the techniques from both this guide on expert Discord tricks and tips and our comprehensive guide on building and managing online communities will undoubtedly result in a dynamic and thriving Discord space. Remember, it’s the combination of effective community management and savvy usage of Discord’s features that truly unlocks the platform’s potential.
]]>1. Shield Your Secrets with Secret Chats
Embark on a journey of unassailable privacy with Telegram’s secret chats feature. These one-on-one encrypted conversations are fortified by end-to-end encryption, ensuring that only you and the intended recipient can decipher the messages. Notably, even Telegram itself cannot access the content of these chats. To initiate a secret chat:
Steps:
- Open Telegram and go to the Chats tab.
- Tap the pencil icon or the “New Message” button.
- Select “New Secret Chat.”
- Choose the contact you want to have a secret chat with.
- Your secret chat is now established, and your messages will self-destruct based on your settings.
2. Unleash Your Aesthetic with Customized Themes
Inject your Telegram chats with your unique style by employing customized themes. These themes encompass diverse color palettes and background visuals, enabling you to curate an ambiance that resonates with your personality.
Steps:
- Open Telegram and navigate to “Settings.”
- Select “Chat Settings.”
- Tap “Change Chat Background” and choose a predefined theme or create your own with custom colors and images.
- Save your theme, and watch your chats transform into a personalized masterpiece.
3. A Multiverse of Accounts, All in One App
Unravel the complexities of managing multiple Telegram accounts with ease. Juggling work, personal, and other profiles is now seamless, eliminating the need for separate applications.
Steps:
- Open Telegram and access “Settings.”
- Scroll down and choose “Add Account.”
- Log in with your alternate account credentials.
- Switch between accounts by tapping your profile picture on the main screen and selecting the desired account.
4. Sticker and GIF Galore
Infuse vibrancy into your conversations by tapping into Telegram’s extensive collection of stickers and GIFs. You can even take it a step further by crafting your own sticker packs for a distinctive touch.
Steps:
- Open a chat in Telegram.
- Tap the smiley icon to access stickers and GIFs.
- Browse through the available stickers and GIFs or use the search function.
- To create a custom sticker pack, use the Telegram Sticker bot or an external bot like Stickerify.
5. Time Travel: Unsend Messages
Rescue yourself from messaging mishaps by utilizing Telegram’s message retraction capability. This feature empowers you to recall messages, even after they’ve been dispatched.
Steps:
- Open the chat containing the message you want to unsend.
- Long-press on the message until options appear.
- Select “Delete” and choose “Delete for you” or “Delete for both” to unsend the message.
Remember, you must act quickly as there’s a time limit for unsending messages.
These are just the first five Telegram tricks in our journey of exploration. Stay tuned for the next installment as we continue to uncover more incredible features that will redefine the way you interact and communicate on this versatile messaging platform.
6. Conversations with a Sonic Twist: Voice Chats
Elevate your communication game with Telegram’s real-time voice chats. Whether you’re hosting a virtual event, coordinating with a team, or simply catching up with friends, this feature adds a dynamic dimension to your interactions.
Steps:
- Open a chat or group in Telegram.
- Tap the three-dot menu icon and select “Voice Chat.”
- Your voice chat room is created; participants can join and engage in voice conversations.
7. Swift Solutions with Inline Bots
Navigate the realms of convenience with inline bots, delivering swift solutions within your chats. These bots allow you to access information, perform tasks, and even play games directly within your ongoing conversations.
Steps:
- Start typing a message in any chat.
- Begin the message with the bot’s username (e.g., @Google).
- Telegram will display a list of inline bot suggestions; select the appropriate bot.
- Follow the bot’s instructions to fetch information or execute tasks.
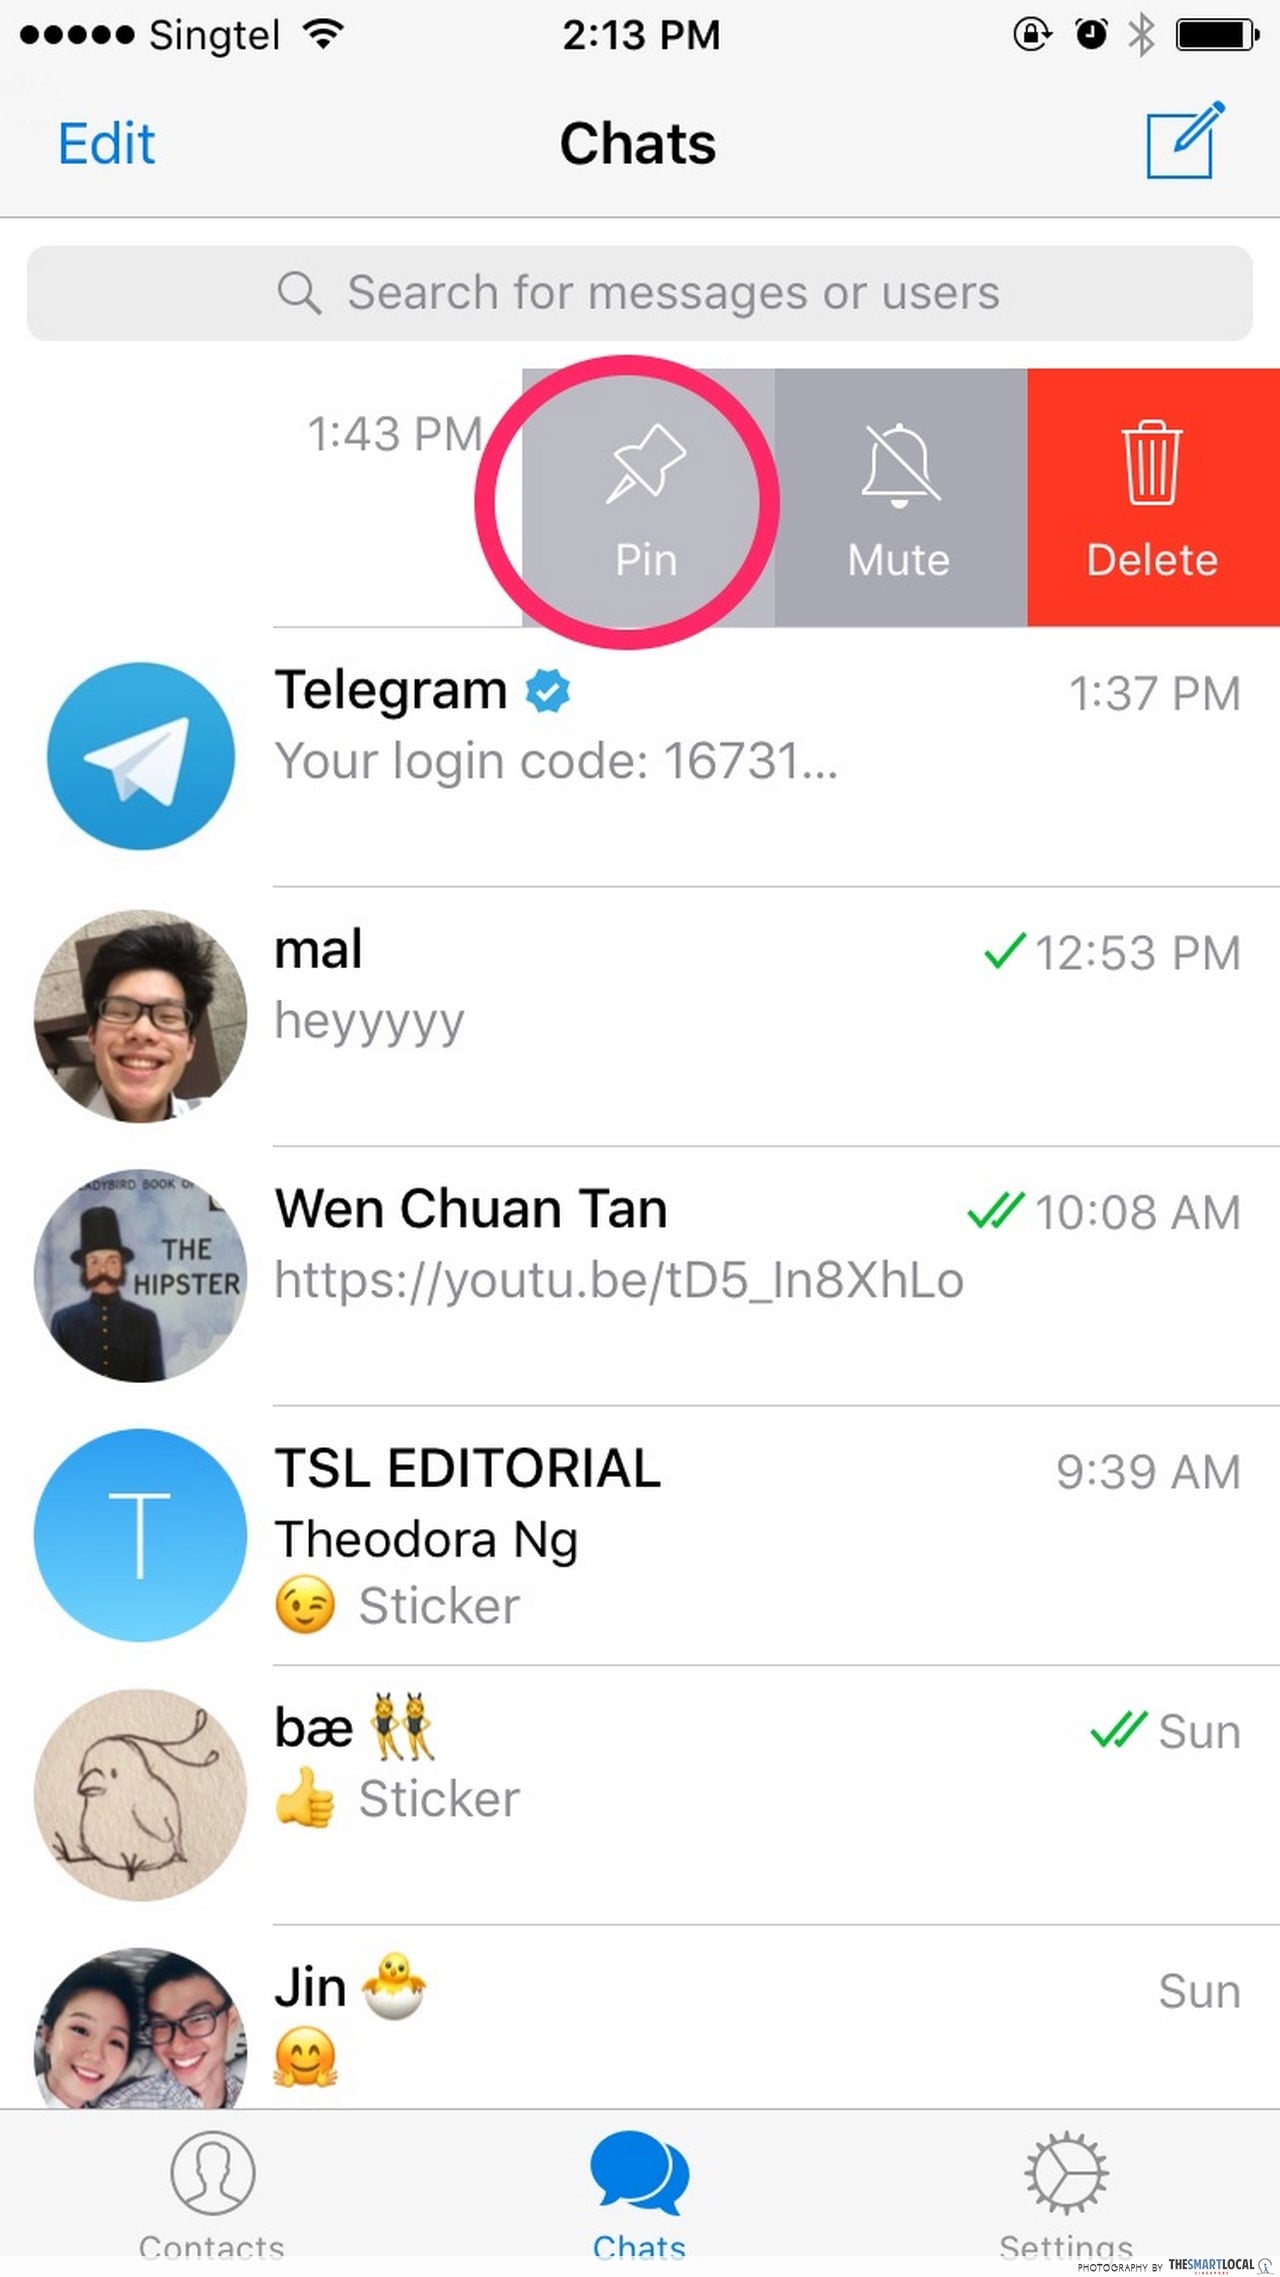
8. Rise and Pin: Elevate Important Chats
Never let crucial conversations drown in the sea of chats. Pinning important chats ensures they remain at the top of your chat list, granting you swift access to vital exchanges.
Steps:
- Long-press the chat you want to pin.
- Tap the pin icon that appears at the top.
- Your pinned chat will now reside prominently at the top of your chat list.
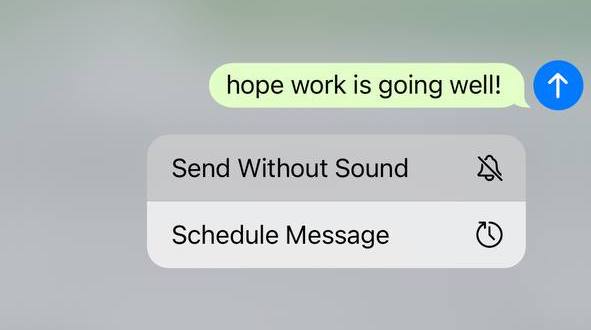
9. Echoes in Silence: Silent Messages
When the need for discretion arises, Telegram’s silent messages come to your rescue. Discreetly send messages that arrive without notification sounds, allowing you to convey updates without interruption.
Steps:
- Compose your message in a chat.
- Before sending, tap and hold the send button.
- Choose “Send without sound” from the options that appear.
- Your silent message is dispatched, ensuring quiet delivery.
10. Find Friends with Finesse: Username Search
Simplify contact discovery by leveraging usernames. This feature eliminates the need to share phone numbers while allowing you to seamlessly connect with friends and contacts.
Steps:
- Tap the search icon in the top-right corner of the Telegram app.
- Enter the username of the person you’re looking for.
- If the username matches a contact, their profile will appear, and you can initiate a chat.
As our Telegram exploration continues, we’re diving into an array of features that push the boundaries of messaging as we know it. Stay with us for the next set of tricks and hacks that will elevate your Telegram experience to unprecedented heights.
11. Symphony of Control: Group Permissions
Steer the dynamics of group chats with finesse through Telegram’s group permissions feature. Administer tailored settings to members, ensuring a structured and organized discourse within your group.
Steps:
- Open the group you’re an admin of.
- Tap the group name to access its settings.
- Select “Permissions” to define roles and privileges for members.
- Customize permissions such as sending messages, adding members, editing group info, and more.
12. A Night Owl’s Haven: Auto-Night Mode
For nocturnal communicators, the auto-night mode offers respite from the glare of bright screens. This feature automatically shifts your Telegram interface into a darker, more eye-friendly mode during the evening hours.
Steps:
- Go to “Settings” in Telegram.
- Choose “Chat Settings” and then “Auto-Night Mode.”
- Select the time range during which you want the night mode to activate.
- Witness the transformation of your interface as the sun sets.
13. Where Time and Location Converge: Location-Based Reminders
Bridge the realms of time and space with location-based reminders, an innovative Telegram feature. Set reminders that trigger when you reach a specific location, ensuring you never forget tasks while on the move.
Steps:
- Open a chat with the Telegram bot “LocationBot.”
- Send your current location to the bot.
- Use the format “/setreminder [location name] [reminder]” to set a location-based reminder.
- Receive your reminder when you’re in the designated area.
You can also read about How to create your own Telegram Bot with Python
14. Emojis, Animated: Expressions with a Flair
Inject animation into your expressions with Telegram’s animated emojis. These dynamic icons reveal their emotions without the need for accompanying text, adding a touch of playfulness to your chats.
Steps:
- Open a chat in Telegram.
- Send an emoji without any accompanying text.
- Witness the emoji come to life with its animated expression.
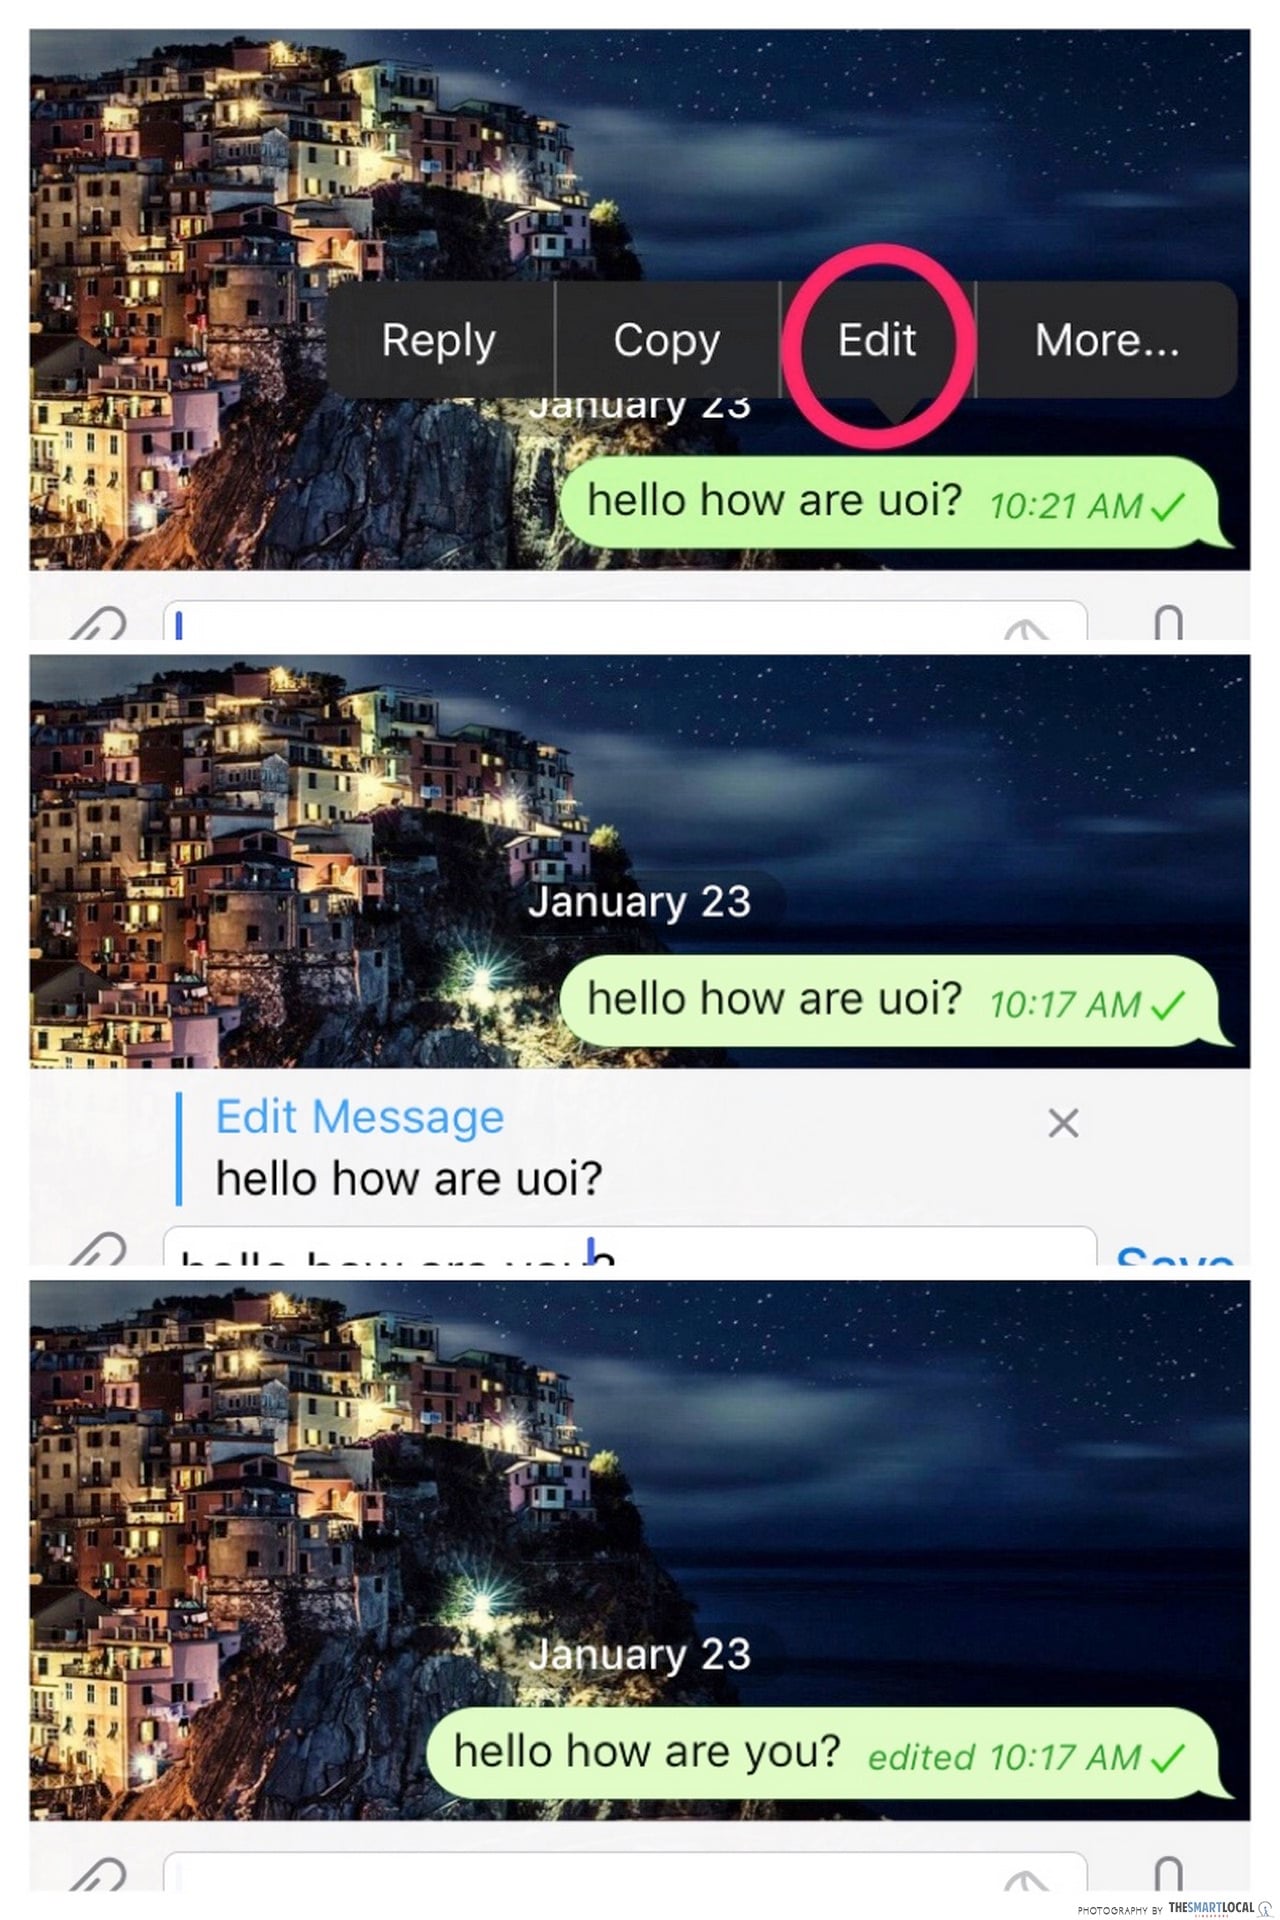
15. Crafting Perfection: Edit Sent Messages
Elevate your message perfectionism by utilizing the ability to edit sent messages in Telegram. Rectify typos, refine phrasing, and enhance communication even after the message has been dispatched.
Steps:
- Open the chat containing the sent message.
- Locate the message you wish to edit and long-press it.
- Choose “Edit” from the options that appear.
- Make your desired changes and confirm the edited message.
With these tricks and hacks, Telegram takes on a life of its own, accommodating your preferences and enriching your messaging experience. The journey doesn’t end here; there’s more to explore and unveil in the next segment of our Telegram adventure. Stay tuned as we continue our exploration of this versatile platform’s hidden gems.
16. Beyond Messaging: Telegram as Cloud Storage
Unlock the latent potential of Telegram as a discreet cloud storage solution. Leverage the “Saved Messages” chat to store files, documents, and media, granting you seamless access across devices.
Steps:
- Open Telegram and navigate to “Saved Messages.”
- Tap the paperclip icon to attach files from your device.
- Share files with the “Saved Messages” chat.
- Retrieve your stored files whenever and wherever you need them.
17. Compression Redefined: Multimedia Minimization
Empower your media sharing endeavors with Telegram’s innovative file compression feature. Send photos and videos without compromising quality, reducing their sizes to ensure swift delivery.
Steps:
- Open a chat in Telegram.
- Tap the paperclip icon to attach a photo or video.
- Select the media file you want to send.
- Telegram will provide options to compress the file before sending.
18. Tempo of Listening: Voice Message Playback Control
Take command of voice messages with the ability to control playback speed. Whether you’re swiftly reviewing instructions or immersing yourself in detailed narratives, this feature adapts to your auditory preferences.
Steps:
- Open a chat with a voice message.
- Tap the voice message to begin playback.
- Tap the 1x button to reveal playback speed options (0.5x, 1x, 1.5x, 2x).
- Select your desired playback speed and experience the message at your pace.
19. Fortify Your Fortress: Two-Step Verification
Strengthen your Telegram stronghold with two-step verification, an additional layer of security to safeguard your account. This feature requires a password in addition to the verification code for added protection.
Steps:
- Access “Settings” in Telegram.
- Tap “Privacy and Security” and then “Two-Step Verification.”
- Follow the prompts to set a password and recovery email.
- Confirm your password and enable the two-step verification layer.
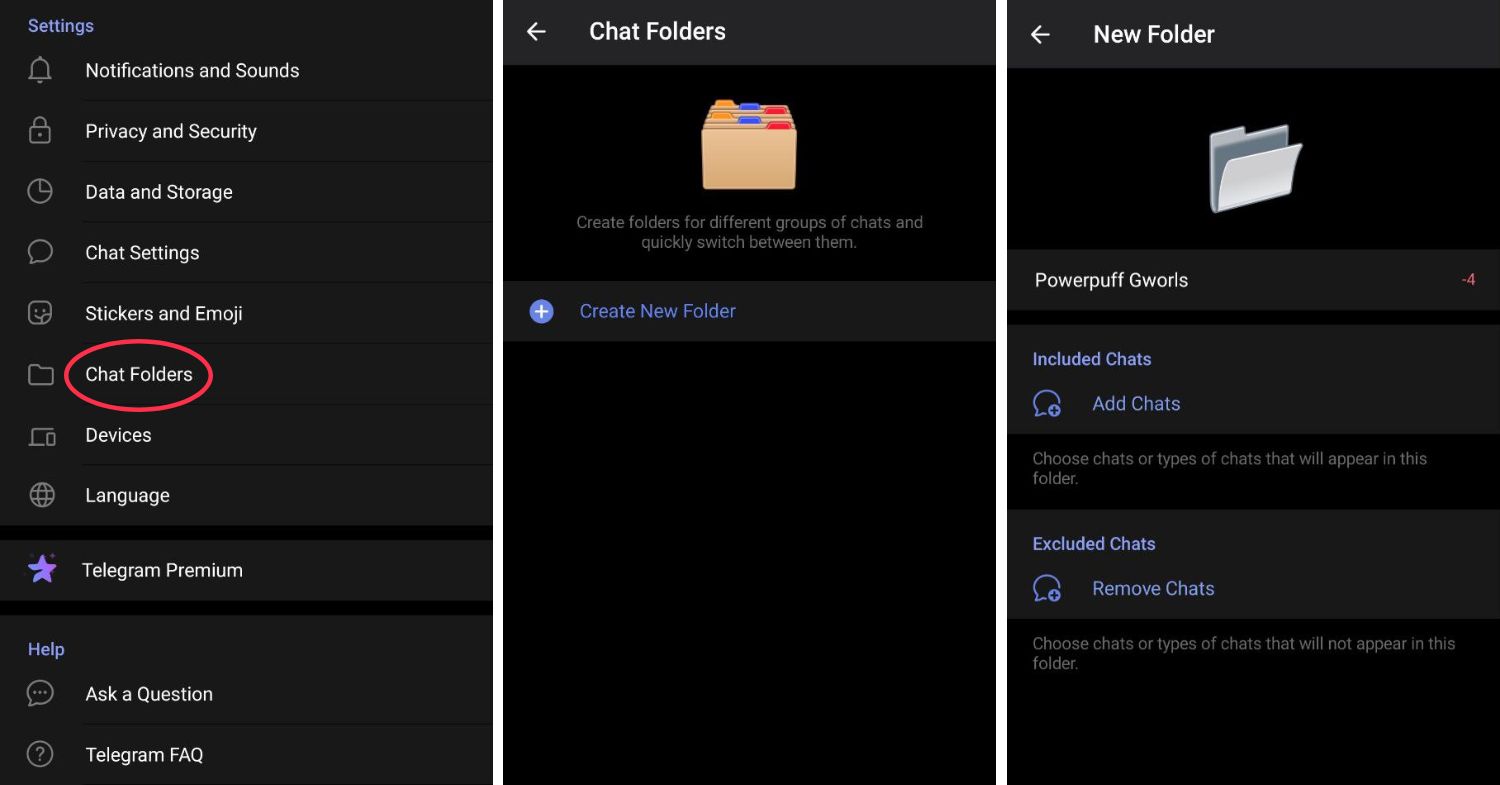
20. The Art of Order: Chat Folders
Harmonize your chat landscape through Telegram’s chat folders, creating an organized hub for your various conversations. Whether categorizing work, friends, or family, this feature elevates your chat management prowess.
Steps:
- In the chat list, swipe from left to right to reveal the sidebar.
- Tap the “Edit” button at the bottom.
- Tap “Create New Folder” and assign a name to the folder.
- Select the chats you want to include in the folder and tap “Add.”
We’re only halfway through our voyage of Telegram discovery! Join us in the forthcoming segment as we unmask more captivating features that continue to redefine the world of messaging and communication.
21. Conversations in Motion: Animated Backgrounds
Transform your chats into dynamic canvases with Telegram’s animated backgrounds. Immerse yourself in captivating visuals that add an extra layer of engagement to your conversations.
Steps:
- Navigate to “Settings” within the Telegram app.
- Choose “Chat Settings” and then “Chat Background.”
- Select “Set Wallpaper” and choose an animated background from the available options.
- Witness your chats come alive with the mesmerizing motion of your chosen background.
22. Insights Unveiled: Chat Statistics
Uncover the intricacies of your messaging behavior with Telegram’s chat statistics. Delve into a treasure trove of information, including message counts, average response times, and more.
Steps:
- Open a chat in Telegram.
- Tap the contact or group name to access the profile.
- Choose “Chat Stats” to explore detailed messaging statistics.
- Gain valuable insights into your messaging patterns and habits.
23. Scan and Assemble: Group Invitations via QR Code
Simplify group entry for your friends and contacts by utilizing Telegram’s QR code feature. Generate a scannable code that grants swift access to your group.
Steps:
- Go to the group you want to share as a QR code.
- Tap the group name to access settings.
- Choose “Invite to Group via Link.”
- Select “QR Code” and share the generated code with your desired audience.
24. Engage and Empower: Polls and Quizzes
Elevate group interactions with interactive polls and quizzes. Foster engagement, decision-making, and even a touch of fun within your Telegram groups.
Steps:
- In a group chat, tap the attachment icon.
- Choose “Poll” to craft a survey-style poll or “Quiz” to create a knowledge-based quiz.
- Add your questions and answer choices.
- Publish the poll or quiz and watch the engagement unfold.
25. Automate for Accomplishment: Productivity Bots
Harness the prowess of Telegram bots to supercharge your productivity. Discover a myriad of bots that assist with tasks such as managing to-do lists, providing news updates, and more.
Steps:
- In the search bar, type the name of the productivity bot you’re interested in (e.g., @TodoistBot for task management).
- Initiate a chat with the bot.
- Follow the bot’s instructions to set up tasks, receive updates, or utilize its features.
With this final set of tricks and hacks, our Telegram exploration comes to a crescendo. This exceptional messaging platform offers a wealth of features that cater to every facet of communication, organization, and engagement. As we bid adieu to our journey, remember that the world of Telegram is ever-evolving, so stay curious and keep exploring to make the most of this dynamic platform.
Conclusion: Revolutionizing Your Telegram Experience
In this comprehensive exploration, we’ve embarked on a journey through 25 remarkable Telegram tricks and hacks, uncovering the hidden gems that lie within this versatile messaging platform. From fortifying your privacy with secret chats to transforming your chats into dynamic canvases with animated backgrounds, Telegram has proven to be a treasure trove of innovation and convenience.
We’ve delved into the art of personalization with custom themes and stickers, navigated the multiverse of accounts within a single app, and even embraced the power of automation through productive bots. Whether you’re seeking to fine-tune your group interactions, gain insights into your messaging habits, or engage in interactive polls and quizzes, Telegram has a feature for every need.
As the world of technology continues to evolve, Telegram remains at the forefront of innovation, consistently rolling out new features and functionalities to enhance your messaging experience. Remember to stay engaged with the Telegram community, explore updates, and continue discovering the wealth of possibilities this platform offers.
By incorporating these tricks and hacks into your Telegram repertoire, you’re elevating your communication, organization, and engagement game to unparalleled heights. So, immerse yourself in this dynamic world, adapt these features to your needs, and watch as your Telegram experience transforms into a captivating journey of discovery and connection.
While Telegram offers a multitude of captivating features and ingenious tricks to enhance your messaging experience, it’s also intriguing to explore similar possibilities in other messaging platforms. If you’re interested in expanding your horizons, you might want to explore our article on “Unlock the Best WhatsApp Hacks: 15 Cool Tips and Tricks You Didn’t Know”
]]>Unveiling Expert WhatsApp Hacks
In this dedicated section, we’ll delve deeper into the world of WhatsApp hacks, highlighting the most effective ways to enhance your experience. From mastering text formatting to guarding your profile privacy, we’ve got you covered with these expert tips and tricks. Let’s dive in and unlock the true potential of WhatsApp!
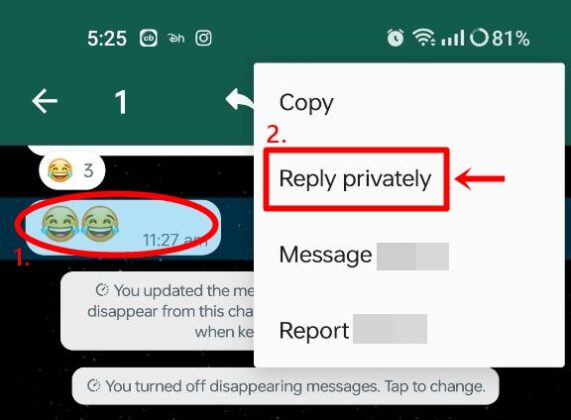
1. Respond Privately: Among the array of nifty hacks, there’s the highly useful “Reply Privately” feature. Within group chats, you might find the need to address a specific message individually. The conventional methods involve taking screenshots or forwarding messages, but the “Reply Privately” feature streamlines this process.
- Long-press the desired message.
- Tap the ‘3-dot’ icon in the upper-right corner.
- Select ‘Reply Privately.’
- Craft your response and hit ‘Send.’
2. Share Voice Stories: Keep things fresh on your WhatsApp status by sharing voice notes. This relatively new addition allows you to showcase your voice, adding a personal touch to your status updates.
- Launch WhatsApp and navigate to ‘Status.’
- Tap the ‘Pencil’ icon at the bottom-right.
- Long-press the ‘Microphone’ icon to record your voice note.
- Share your creation with the ‘Send’ button.
3. Chat Sans Number Saving: For those engaging with new contacts daily, this “Chat Without Saving Number” trick is a game-changer. By leveraging WhatsApp, you can chat seamlessly without the need to save numbers.
- Copy the intended recipient’s number.
- Open WhatsApp and paste the number in a self-chat.
- Click on the number to display options.
- Select ‘Chat’ to send messages, media, and more without saving the contact.
4. Manage Media Visibility: Keeping your gallery clutter-free is made simple with the “Media Visibility” feature. Customize which chat content populates your gallery to keep it organized.
- Access a chat and tap the name at the top.
- Scroll down and pick ‘Media Visibility.’
- Choose ‘No,’ then confirm with ‘OK.’

5. Share Call Links: WhatsApp keeps pace with the rise of video conferencing, allowing you to share call links seamlessly. This feature simplifies connecting with others for ongoing calls.
- Navigate to ‘Calls’ in WhatsApp.
- Choose ‘Create Call Link’ at the top.
- Select call type (video/voice).
- Share the link within or outside WhatsApp for hassle-free connections.
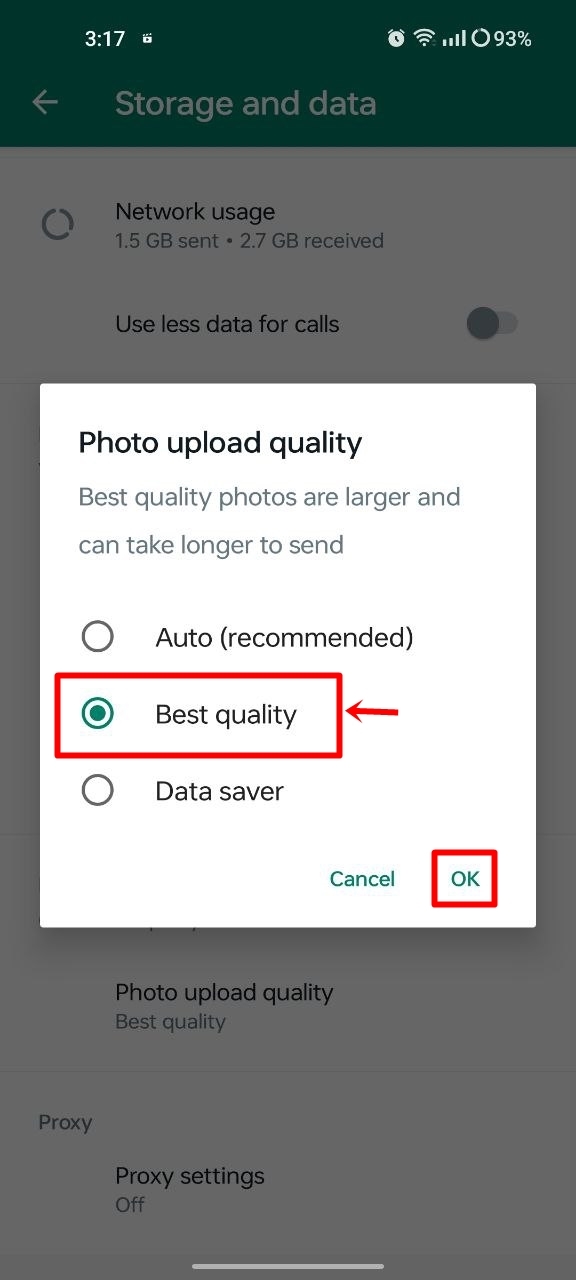
6. Elevate Photo Quality: Enhance the visual experience of shared images by sending them with higher quality. Adjust your settings to optimize image sharing.
- Open ‘Settings’ from the 3-dot menu.
- Select ‘Storage and Data.’
- Opt for ‘Best Quality’ under ‘Photo Upload Quality.’
7. Embrace Disappearing Messages: Prioritize privacy by enabling the “Disappearing Messages” feature. Set messages to vanish within a specified timeframe for enhanced privacy.
- Activate disappearing messages from chat settings or WhatsApp settings.
- Tailor timeframes: 24 hours, 7 days, or 90 days.
8. Effortless Media Deletion: Streamline media purges from specific chats with ease, simplifying the process of cleaning up your chat history.
- Access WhatsApp settings.
- Choose ‘Storage and Data.’
- Opt for ‘Manage Storage’ and select the desired chat.
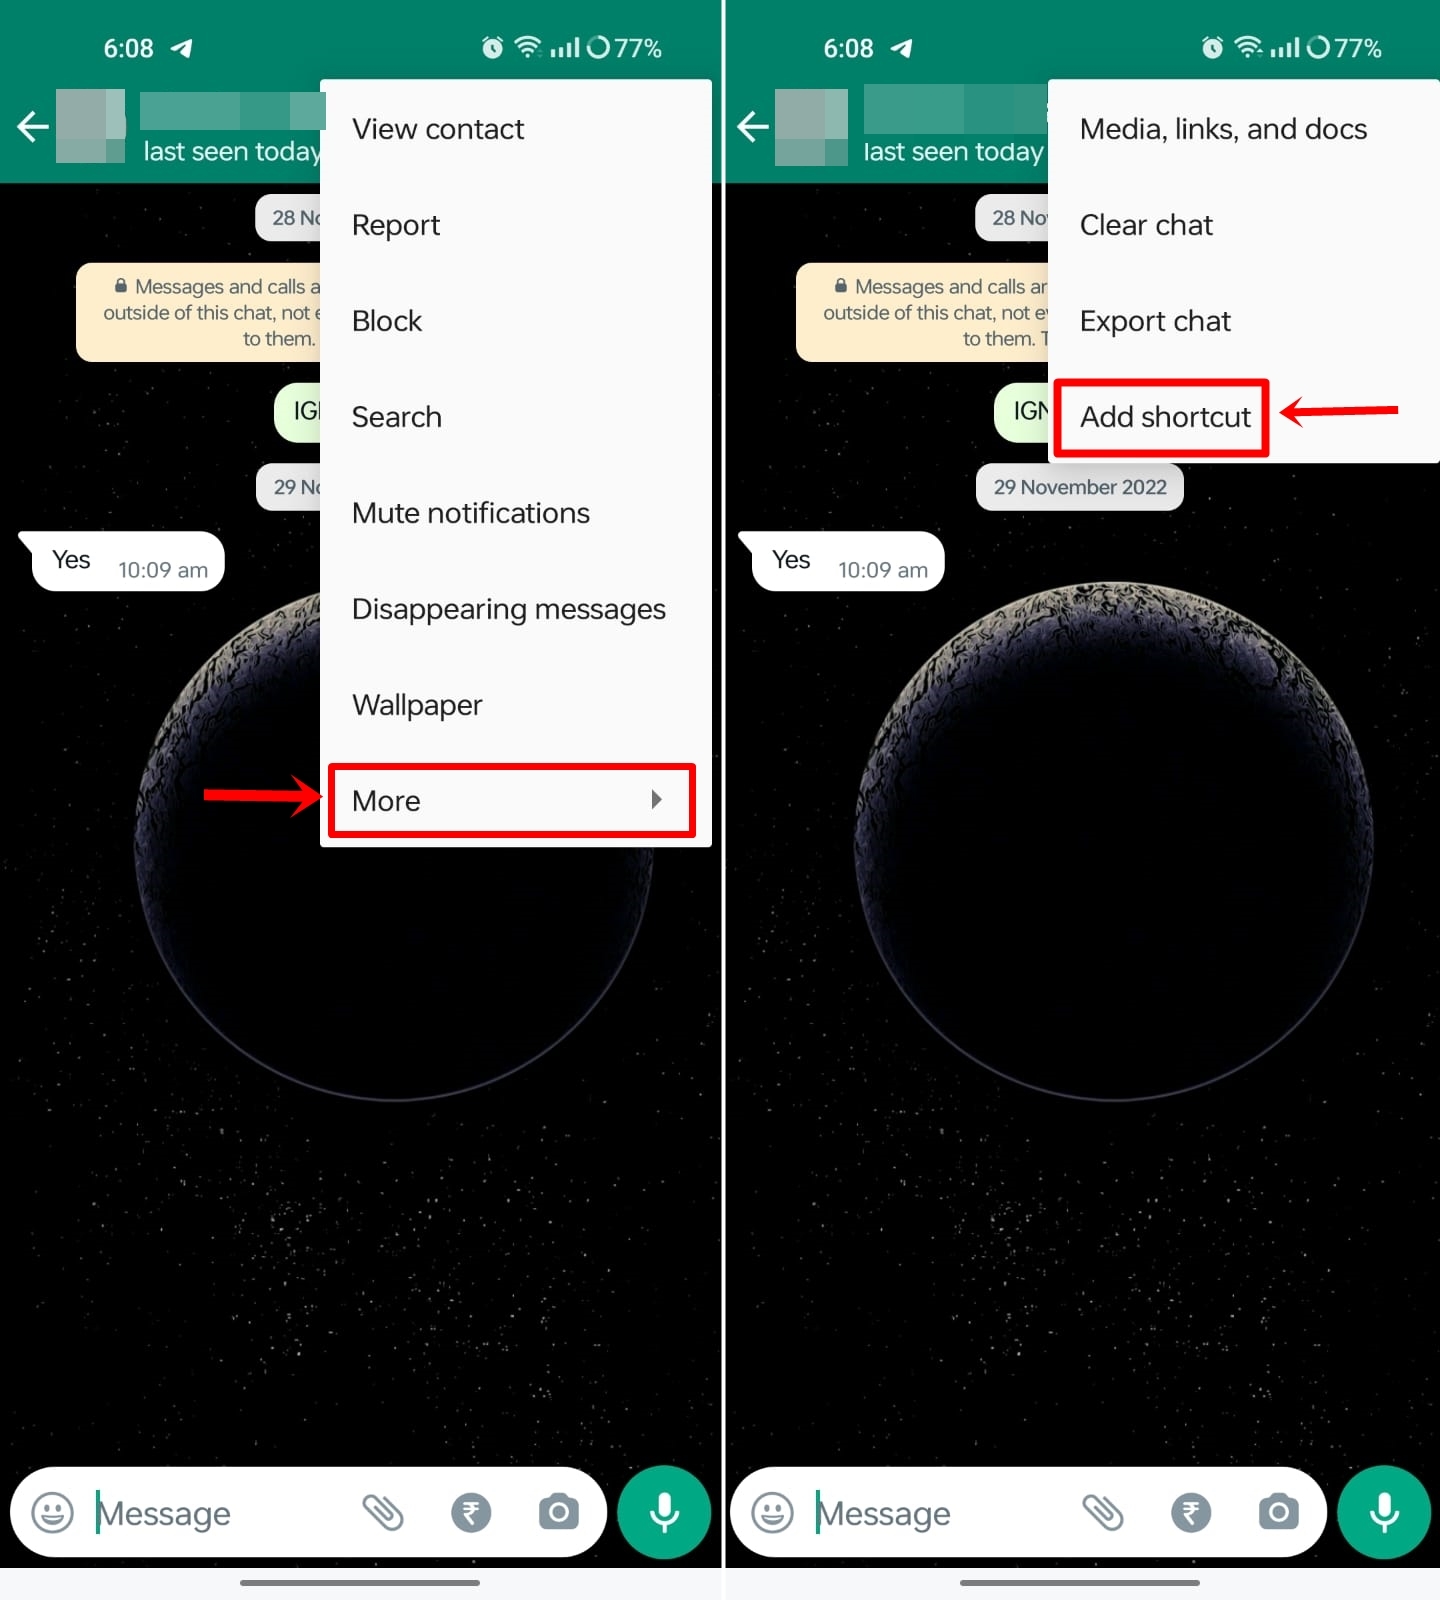
9. Chat Shortcuts on Homescreen: Save time accessing your most frequent chats by adding shortcuts to your Android homescreen.
- Enter a chat and tap the menu.
- Select ‘More’ and pick ‘Add Shortcut.’
- The shortcut appears on your homescreen.
10. Enhance URL Previews: Make shared URLs on WhatsApp status more engaging by incorporating images and captions to convey their essence.
- Download a relevant image.
- Craft a status with the image and URL in the caption.
Keep exploring the remaining insightful WhatsApp hacks, tips, and tricks in the continuation of this comprehensive guide!
11. Control Profile Photo Privacy: Safeguard your profile photo from prying eyes:
- Access ‘Privacy’ in WhatsApp settings.
- Navigate to ‘Profile Photo.’
- Select ‘My Contacts’ or ‘My Contacts Except’ and specify viewers.
12. Resurrect Deleted Messages: Explore deleted messages through notification history:
- Head to Android settings.
- Access ‘Notifications’ and toggle on ‘Notification History.’
13. Group Entry Control: Prevent unsolicited group adds:
- Open WhatsApp settings.
- Navigate to ‘Groups’ under ‘Privacy.’
- Choose ‘My Contacts’ to restrict group adds.
14. Authorize Group Participants: Admins, maintain control by approving new entrants:
- Open a group chat.
- Access ‘Group Settings’ and activate ‘Approve New Participants.’
15. Master Text Formatting: Craft visually striking messages using text formatting:
- Send italics: Enclose text with underscores (_).
- Send bold text: Enclose text with asterisks (*).
- Send strikethrough text: Enclose text with tildes (~).
Unveil the Full Potential of WhatsApp! Don’t let these hidden gems remain undiscovered. Empower your WhatsApp experience with these top-notch hacks, tips, and tricks. From seamless private replies to enhancing image quality, these insights promise to revolutionize your interactions. Step into the world of enhanced communication and unleash the power of WhatsApp like never before!
]]>Discord is a popular communication platform widely used by individuals and communities across various industries, including the crypto space. It provides a space for people to connect, chat, and collaborate in real-time, offering a range of features that enhance communication and community engagement.
In the crypto space, Discord serves as a hub for crypto enthusiasts, traders, investors, and developers to come together and discuss the latest trends, market updates, and projects. Crypto communities often create dedicated Discord servers where members can share insights, ask questions, and participate in vibrant discussions about cryptocurrencies, blockchain technology, decentralized finance (DeFi), NFTs, and more.
These Discord servers act as virtual meeting places, fostering a sense of community and allowing individuals to network, learn, and stay up-to-date with the rapidly evolving world of cryptocurrencies. From sharing research and analysis to organizing events and AMAs (Ask Me Anything), Discord offers a versatile platform for crypto-related activities.
Additionally, Discord’s text and voice chat features enable seamless communication, enabling traders to discuss market movements, developers to collaborate on projects, and crypto enthusiasts to connect with like-minded individuals. It serves as a valuable resource for seeking advice, finding project partners, and staying connected with the broader crypto community.
With its user-friendly interface and extensive customization options, Discord has become a go-to platform for crypto enthusiasts to engage, learn, and build relationships within the dynamic and ever-expanding crypto space. Whether you’re a seasoned trader, a passionate investor, or simply curious about cryptocurrencies, Discord provides a space for you to connect, share knowledge, and be part of the exciting crypto ecosystem.
What is Inspect Element?
Inspect Element is a powerful developer tool integrated into popular web browsers like Chrome, Safari, and Internet Explorer. It allows web developers to access and edit the code of web page content, including HTML, JavaScript, and CSS files. In the case of Discord, Inspect Element enables users to modify various elements such as messages, timestamps, and more.
Steps to Inspect Element on Discord
Inspecting elements on Discord is a straightforward process. Follow these steps to get started:
- Open Discord in a web browser.
- Log in to your account and navigate to the server’s chat section where you want to make changes.
- Highlight the element you wish to modify, such as a message or timestamp.
- Right-click on the highlighted element to open a small menu.
- Click on the “Inspect” option from the menu.
Shortcut for Inspect Element (Windows and Mac)
If you prefer using keyboard shortcuts, here’s how you can quickly access Inspect Element:
- Windows: Press and hold Ctrl+Shift+I.
- Mac: Press and hold Command+Option+I.
Replacing Text Messages Using Inspect Element
Now that you know how to access Inspect Element, let’s explore how you can create fake Discord messages to prank your friends. Follow these steps:
- Choose a text or message in the Discord chat that you want to modify.
- Highlight the text or message and either right-click on it and select “Inspect” or use the keyboard shortcut mentioned above.
- In the Inspect Element window, locate the highlighted text and double-click on it to edit.
- Edit the text as desired.
- Press Enter to save the changes.
- Close the Inspect Element window.
Your modified message will now appear in the chat.
Revealing Password Using Inspect Element
Apart from creating fake messages, you can also use Inspect Element to reveal a hidden password. Here’s how you can do it:
- Visit the Discord website using a web browser on your computer.
- Click on the “Login” button to access the Discord login screen.
- Highlight the hidden password field and open Inspect Element.
- Press Ctrl+F within Inspect Element and search for “Password.”

- Locate the section with the attribute type=”password.”
- Double-click on type=”password” and replace the value with any text.

- Press Enter to reveal the password on the Discord login screen.
Note: Be cautious while revealing passwords and ensure that you have permission to access the account.
Other Components in Inspect Element Discord
Inspect Element offers additional advanced features that you can explore. These features are related to web technologies such as CSS, JavaScript, and WebAudio. To access them:
- Click on the three vertical dots at the top right corner of the Inspect Element screen.
- Select “More Tools” from the menu.
Please note that utilizing these advanced features may require a good understanding of web development tools.
Stay Safe from Discord Inspect Element Scams
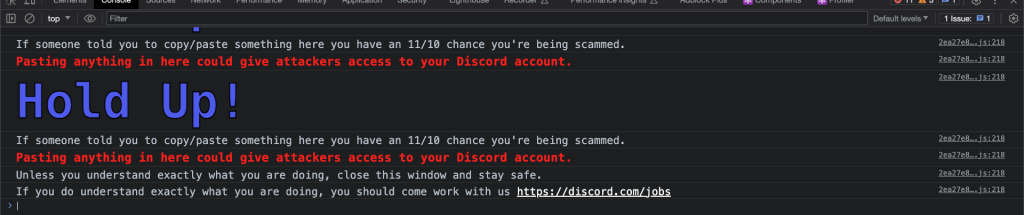
It’s important to stay vigilant and protect your Discord account from potential scams. Avoid pasting any code in the console section of Inspect Element if a Discord user requests it. This could potentially expose your account to attackers. Be cautious and only engage with the console panel if you have a firm knowledge of web development tools.
Conclusion
Inspecting elements on Discord can be a fun and creative way to customize your chatting experience. By following the steps outlined in this guide, you can modify messages and reveal hidden passwords. However, always use these features responsibly and ensure that you respect the privacy and security of others. Enjoy exploring the possibilities of Inspect Element on Discord!
Since you found our article on inspecting element on Discord informative, we believe you might be interested in exploring related content as well. One such topic is the power of YouTube Thumbnail Downloaders. Discover how to download YouTube thumbnails and maximize the visual appeal of your videos. By customizing your video previews, you can attract more viewers and increase click-through rates. Our comprehensive guide provides step-by-step instructions to help you get started. Unleash the potential of captivating thumbnails and elevate the impact of your YouTube content. Dive into the world of YouTube Thumbnail Downloaders and enhance your video marketing strategy today.
]]>
Why use YouTube Thumbnail Downloader?
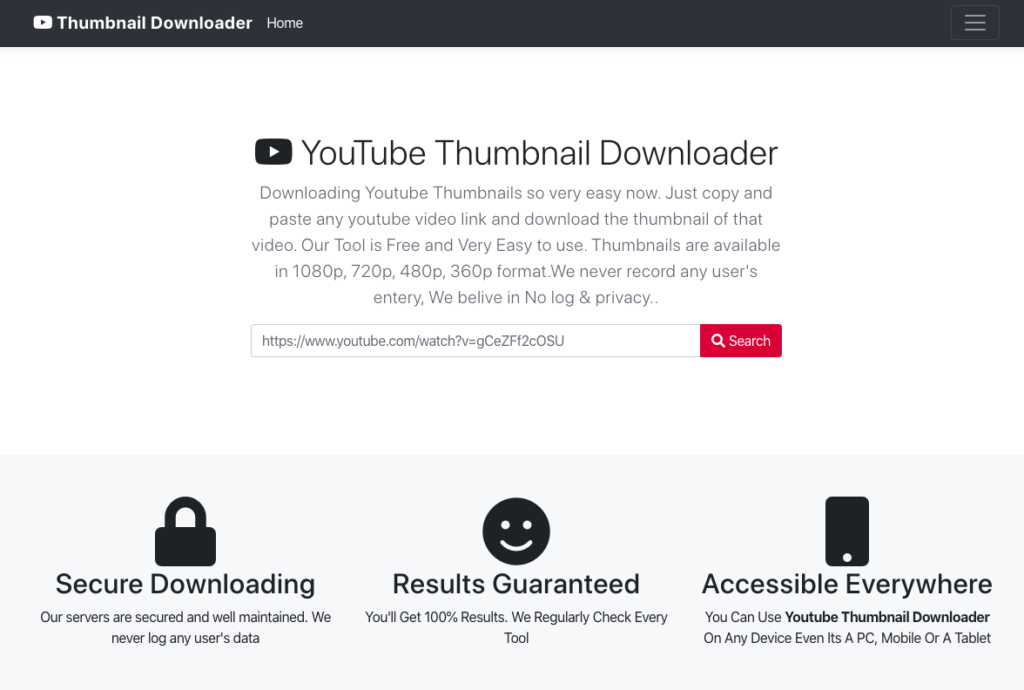
You can use the Thumbnail Downloader (or YouTube thumbnail grabber) to download any YouTube video image. You can use the downloaded images for anything you want: for work, blogs, graphics, or just to share among friends.
Why choose YouTube Thumbnail Downloader?
Easy to use!
YouTube Thumbnail Downloader is so easy to use: just copy and paste the YouTube video URL on our search bar, and hit “Search”.
Completely Free!
YT Thumbnail Downloader is a 100% free online tool for video thumbnail download.
100% Risk-Free!
Our servers are secure and well-maintained. We do not retain any user data.
Works On Any Device!
You can access YouTube Thumbnail Downloader tool from any device you like: PC, Mobile, or Tablet.
How to download YouTube video thumbnails with YT Thumbnail Downloader
- Copy the URL of the YouTube video from the browser’s address bar.
- Paste the URL on the tool’s search bar.
- Hit “Search”! The video thumbnails will be downloaded to your Downloads folder.
What is a Thumbnail?
Thumbnails are mostly a duplicate, but smaller version of an image in a page, which is used to decrease the load time of the particular web page by utilizing less bandwidth. The most popular way of producing thumbnails is saving a resized, smaller version of each original image and rendering that on the webpage. Some experts also use client-side scripts to resize and render the original image itself, without saving thumbnails separately.
Why are custom thumbnails more popular?
Nowadays, having custom thumbnails for videos is very popular. Instead of having a still of the video itself, a custom thumbnail for a YouTube (or any other) video adds value to the video itself.
What are video thumbnails? Read here.
How to make the most out of a custom video thumbnail
- A custom thumbnail should always be an explicitly designed or expertly shot image. It should not be a still of the particular video.
- The image used as the video thumbnail should capture the essence of the video it represents, and the small size of the thumbnail should not affect the thumbnail’s purpose.
- Text on the image should be used sparingly. Having too much text on a small thumbnail image is not ideal. Use the video title to add whatever extra text you need to have. Keep text off the thumbnail as much as possible.
- When designing a video thumbnail, always keep the YouTube thumbnail format in mind. Remember the video length timestamp in the right-bottom corner, and the Watch Later and Add To Queue buttons down the right-top corner. Design your thumbnail images in a way where any important parts will not be hidden by these features.
You can also check our other Online Tools from here.
]]>People suffer in the modern world just because of their over-the-line posh lifestyles. Credit cards are one of those unspoken demons who take people into dark pits of debt even without their own knowledge. But there are ways for you to enjoy those credit card benefits as well as be free of unnecessary debt. Also similarly, there are ways to get rid of that credit card debt which you are already in. Here is how!
How to get rid of Credit Card Debt
01. Plan and set goals
First of all, you have to be realistic or else you will never get out of debt in time. Think of how you got into debt and then also think about how much you have now in hand. Then pre-meditate on how much you will have in your hand in the future. Think about all the other debts you have. Then sit down and plan on how you are going to pay off each one of them. Make a plan of paying off your credit card debt slowly and carefully. Set a monthly goal. But remember, it has to be realistic.
02. Ice Ice Baby
This is one of the most effective methods. It is based on the simple principle of “If you want to get rid of something, stop adding to it.” It means that you have to stop using your credit cards for a while. Do not worry. Once you have paid off all the debts and you are ready to stop bad habits of spending too much and spending on unwanted things. When you stop using credit cards for a while, there are 2 main benefits. One is that you will not have more debt adding to your account. Secondly, you will learn to live on limited finances and to thrift.
03. Cut and cut more
This is so simple. Stop spending too much. Just like you followed the first step, sit down. Make a list. Make a list of things you spend on based on their amount. When you have decided on what you have spent mostly on, think twice whether you need to actually spend on that. Likewise, continue downwards. Then you will realize how much extra spending you have been doing. When you keep on doing it you will cut down on many things than you have ever imagined. Another method is to think twice when you are going to buy something.
04. Stop impulsive buying
This is another modern-day problem faced by many people because of online shopping. When you go searching for something you want online, after you select the certain item to and select buy, you see certain items suggested to you saying that other people bought those items too. Those are programmed to enter your mind and compel you to buy other items that you actually did not want in the first place. And when you are tempted to buy them you spend additional money than you wanted to spend. They add up to your credit card debt. And you end up in a bottomless pit of debt. So, stopping impulsive buying thinking of the debt you are in and buying something online only if you really need it will help you big time.
Ways to Stop Overspending on Impulse Buys. Read now
05. Use the most famous method
Many people have a lot of ideas when it comes to getting rid of debt. If you see closely, you will understand that there are more people who were immensely in debt and got out of it than people who lost it all and could not get out of debt at all. So, use their ideas. But analyze them according to your ability to pay the debts off. If you choose a method just because you found that method appealing, it will not be so good for you. It does not guarantee that you will be able to get rid of the debt. So what you can do is combine a method used by many with your achievable goals. Then you will have the perfect plan to get rid of all your credit card debts. But you have to work according to your plan because nothing works out on their own.
Also, you can read our article on 05 Ways on How to Get Rid of Debt from here. Good luck getting out of your credit card debt! You can do it!
]]>Here we are bringing you five useful tips on how to manage your money and how not to be stressed about being in debt. There’s nothing wrong about being in debt if you can pay them off duly without having to go through troubled days.
Luckily, there are many ways to get rid of debt, and not all of them will make you miserable. Some of these tips we highlight below can even be used in tandem in order to help you squash debt faster.
How to Get Rid of Debt
Ready to get rid of debt? Here are 05 ways to get going.
01. The Snowball Method
The first step of this method is to make a list of all the debts you owe (from smallest to largest). And collect all your excess funds and pay off the smallest debt. While doing this pay the minimum payment amount on your larger debts such as credit card debts.
When the smallest debt is paid, you will get the chance to use those excess funds to pay the next smallest debt. By continuing this method while paying attention to due dates on the side, you will be able to manage the debts and get rid of them sooner than you think to give you sustainable mental satisfaction as well.
02. Paying more than the Minimum Amount
People have many types of debts; credit cards, personal loans, student loans, etc. And many people choose the method of just paying the minimum amount due. This is not the best practice. The most ideal method would be to pay them sooner when you have money. It won’t hurt to pay a bit more than the minimum due payment because it will help you get out of debt sooner than planned.
For this, you have to be cautious about the payment plan beforehand. When you borrow money, make sure that you will not have to face any prepayment penalty charges. Some lenders have these kinds of rules and regulations in their agreements, so be sure not to obtain such a loan at all times possible.
03. Bid Goodbye to Expensive Habits
You may have heard many stories about how millionaires and billionaires lost everything because of their expensive habits. This culture has become almost unavoidable due to Social Media and popular culture. But this does not mean that you cannot avoid the wave. If you do the best to ditch all your expensive habits while on debt, you will be able to pay off them sooner and live a real stress-free life.
Look carefully at how you spend your income on a daily basis. Maybe you eat out too often, maybe you try out expensive malls too often, maybe you go out with friends to expensive places too often, maybe you want to keep up with the trends so much that you buy expensive attire too often. All these unwanted habits can be dropped if you try. And once you are out of debt and pretty stable on your own, you will be able to do those again. But remember that it is never a good idea to get used to expensive habits.
10 Expensive Habits You Can, And Should, Break Today. Read now
04. Negotiation is the Key
Always try to bring the interest rates down by negotiating with the credit card providers. Many people get into the trap of debts because of credit card usage. But if one can use them wisely, credit cards can also be your savior. It is all about how you handle the payments and how you choose a credit card provider.
Always go for a lesser interest rate. Always try to negotiate and bring down interest rates. There are so many customizable credit card plans available at the moment.
Not only credit card bills, but there are also several other types of bills and debts which you can customize or negotiate to bring it down. And in addition, keep track of all your debts and bill payments in an orderly manner, so that you would not miss any payment and face unwanted penalty fees.
05. Summer Jobs and Part-time Jobs
Are you someone who gets a long summer holiday? Do you have any time after your daily usual work? Then it would be a great idea to do a summer job or a part-time job in the time left. This idea works out best for students but might fit regular work people as well.
Seasonal jobs and part-time jobs have been around for a long time and practically pop-up everywhere when needed. Take a stroll around the alley and you will find a dozen job opportunities. Some might require physical activities while others don’t. Think of the requirements and the pay they are offering and choose a better seasonal or part-time job and save up some money to pay off the debts. Choose a reliable job carefully so that you would not be disappointed on the payment day.

There you go. Our 05 ways to get rid of debt and breathe fresh air into your debt-free journey. Try a few of these tips and see if they work for you. Cheers to a debt-free life.
How to get rid of Credit Card Debt? Read how
]]>